Introduction
Sharp, defined edges around trees separate amateur landscapes from professional installations. That clean border between lawn and mulch bed protects mature trees while creating visual impact that elevates the entire property.
Tree edging serves multiple functions. It prevents grass from invading mulch beds, where aggressive turf roots compete with trees for water and nutrients. It keeps mulch contained during heavy rain and maintains consistent depth for soil moisture retention.
Most critically, proper edging creates a protective buffer zone that prevents lawn equipment from damaging bark. Research shows that mechanical damage from string trimmers and mowers is a leading cause of urban tree decline. Equipment injuries create entry points for pathogens that compromise tree health.
The following nine edging methods range from zero-cost DIY solutions to professional-grade systems. We'll cover installation techniques, cost considerations, and performance characteristics to help you select the right approach for your project requirements.
TLDR: Key Takeaways
- Physical barriers prevent grass intrusion and retain mulch around tree bases
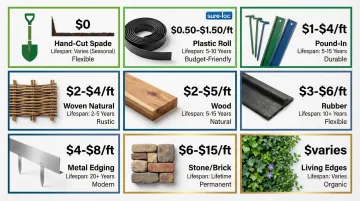
- Options range from $0 (hand-cut) to $15+ per foot (metal/stone systems)
- Choose based on budget, permanence, landscape style, and tree size
- Install 6-12 inches from trunk, extending to drip line when possible
- Aluminum edging delivers 20+ year lifespan with minimal maintenance
What is Tree Edging and Why It Matters
Tree edging creates a defined perimeter that separates tree beds from surrounding lawn. This physical barrier establishes a protected zone around the tree base, clearly delineating where lawn ends and tree bed begins.
The functional benefits extend well beyond appearance. Edging prevents common problems that compromise tree health: aggressive grass roots competing with tree roots for nutrients and water, mulch washing into lawn areas during rain events, and accidental trunk damage when string trimmers and mowers get too close to bark.
Studies confirm that mechanical damage is a primary vector for pathogen entry, making equipment-free zones essential for tree longevity.
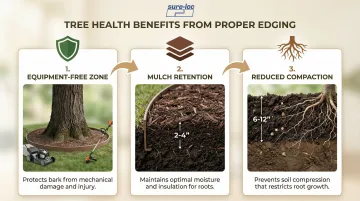
Proper edging supports tree health in three key ways:
- Creates a protected zone free from lawn equipment
- Maintains consistent mulch depth of 2-4 inches
- Reduces soil compaction around the root zone
The majority of a tree's absorptive roots are located in the top 6-12 inches of soil, where compaction from heavy mowers can severely limit oxygen and water availability. A well-defined bed eliminates the need for equipment to drive over this critical root zone, protecting the tree's vascular system while creating a clean, professional appearance.
9 Best Ways to Edge Around Trees
These methods are organized from most affordable to premium options, with each suited to different landscape styles, maintenance preferences, and budget levels. Understanding the trade-offs between cost, durability, and aesthetic impact will help you select the optimal solution for your specific trees and property.
Hand-Cut Spade Edging
Hand-cut spade edging is the most cost-effective method, requiring only a flat spade or half-moon edger to cut a clean V-shaped trench around the tree's mulch bed. This technique involves cutting 4-6 inches deep to create a physical barrier that grass cannot easily cross.
Installation technique:
- Face the bed and cut vertically with your spade
- Face away from the bed and cut at a 45-degree angle
- Remove the grass wedge to create a 4-6 inch wide trench
- Ensure the trench is clean and well-defined
Annual re-cutting is required as grass grows back, making this labor-intensive but ideal for homeowners who enjoy changing bed shapes or expanding tree rings as trees mature. The zero material cost makes it attractive for budget-conscious property owners, though the ongoing labor investment should be factored into long-term planning.
Re-cutting is typically needed once or twice per year to maintain clean lines and prevent grass rhizomes from crossing the barrier.
Plastic Roll Edging
Flexible plastic edging comes in 20-50 foot rolls, typically 4-6 inches tall, and is installed by digging a shallow trench and securing with landscape stakes every 3-4 feet. Professional-grade versions use high-density polyethylene with UV inhibitors to prevent cracking and extend lifespan.
Pros and cons:
- Advantages: Inexpensive at $0.50-$1.50 per foot, easy to create curves, widely available at garden centers
- Disadvantages: Can become brittle in cold climates, may push up from freeze-thaw cycles, visible top edge can look basic
Best results come when most of the edging is buried below grade, leaving only 1-2 inches visible above ground. It's recommended for temporary solutions, rental properties, or budget-conscious homeowners who plan to upgrade later.
Round-top or "bead" designs resist sinking better than flat profiles, and grooved designs with steel stakes help prevent frost heave—a common failure mode in northern climates.
Pound-In Plastic or Metal Edging
No-dig edging strips feature a flanged bottom that you hammer directly into soil using a rubber mallet, typically 4-5 inches tall with decorative top profiles. Installation is faster than roll edging since no trench is needed, though performance is best in softer soils.
Clay or rocky soil requires pre-cutting a narrow slit with a spade to guide the edging.
Metal versions ($2-$4 per foot) are more durable than plastic ($1-$2 per foot), resist frost heave better, and maintain clean lines for 10+ years with minimal maintenance.
Installation considerations:
- Works best in loamy or sandy soils
- Requires rubber mallet and patience
- May need seasonal adjustment after freeze-thaw cycles
- Decorative profiles available to match landscape style
Surface-mounted or shallow-depth edging is less effective at stopping invasive grass roots than trenched options. Manufacturers recommend hammering spikes every few feet to secure the profile.
Seasonal maintenance may involve re-hammering spikes that have worked loose during ground movement.
Steel or Aluminum Landscape Edging
Professional-grade metal edging offers the most durable and precise edge, with aluminum being rust-proof and steel requiring powder coating for longevity. Steel edging offers 20-30+ year lifespans for permanent installations, while aluminum provides 15-25+ years of maintenance-free service.
Installation process:
- Dig a 4-5 inch trench along the desired edge line
- Place edging with stakes inserted through built-in pockets
- Backfill and tamp soil firmly against the edging
- Ensure the top edge is level and consistent
Quality systems like Sure-loc feature no-overlap joints and adjustable staking for curves and frost heave resistance. The dual stake locking system creates seamless connections without visible overlaps, maintaining crisp lines that define professional installations.
Anti-frost heave technology uses stake pockets that accept stakes at 45-degree angles, helping keep edging securely anchored when ground shifting occurs during freeze-thaw cycles.
Cost ranges from $4-$8 per foot installed, with benefits including 20+ year lifespan, crisp lines that require no maintenance, and the ability for mower wheels to ride the edge.
The clean professional look is preferred by landscape architects and commercial properties where long-term appearance and minimal maintenance are priorities.
Natural Wood Edging
Wood edging options include landscape timbers, cedar boards, log rounds, or decorative wood borders that add rustic charm and work well in cottage or woodland garden styles. The natural aesthetic complements informal landscapes and provides a softer visual transition than metal or masonry.
Lifespan by wood type:
- Rot-resistant woods (cedar, redwood, cypress): 5-8 years
- Pressure-treated lumber: 10-15 years
- Untreated pine or fir: 2-3 years (not recommended)
Installation involves leveling ground, cutting sections to length, and securing with rebar stakes driven through pre-drilled holes. Cost ranges from $2-$5 per foot depending on wood type, with pressure-treated lumber offering the best value for longevity.
Maintenance considerations:
- Wood will eventually rot and need replacement
- Can be damaged by string trimmers
- May attract termites if placed directly against tree trunks
- Maintain 6-12 inches clearance from bark
- Use lumber rated for ground contact (Use Category 4A)
Stone, Brick, or Concrete Edging
Masonry edging is a premium, permanent option using materials like natural stone, brick pavers, or concrete blocks arranged in single or double rows around tree beds. It delivers an elegant appearance that increases property value while providing extremely durable borders.
Installation steps:
- Excavate 2-3 inch deep trench around tree bed perimeter
- Add sand or gravel base for stability and drainage
- Set stones level using rubber mallet, checking frequently
- Fill joints with sand or mortar depending on desired permanence
Proper installation requires a compacted aggregate base followed by 1 inch of bedding sand, with edge restraints spiked into the base to prevent paver migration. Polymeric sand in joints prevents weed growth and insect mining.
Pros: Elegant appearance, extremely durable, increases property value, available in countless styles
Cons: Expensive at $6-$15 per foot, labor-intensive installation, permanent placement makes bed size changes difficult
Masonry edging works exceptionally well for formal landscapes, historic properties, and high-end residential or commercial installations where the investment in permanent edging is justified by long-term aesthetic and functional benefits.
Decorative Rubber Edging
Recycled rubber edging mimics the look of stone or wood while offering flexibility, durability, and eco-friendly benefits from repurposed tires. Products are often 100% post-consumer recycled rubber with polyurethane binders, tested for brittleness resistance to -40°F.
Secured with stakes, it won't crack or splinter, and allows mowers to ride over the edge. The flexibility makes installation around curved tree beds simple, while the soft edges won't cause injury—ideal for families with children or pets.
Rubber edging is resistant to UV light, moisture, oil, and temperature extremes, providing 10+ years of service without the rot, rust, or brittleness issues that affect other materials.
Cost typically ranges from $3-$6 per foot, positioning it as a mid-range option that balances durability, safety, and environmental responsibility. The informal aesthetic works best in casual landscapes rather than formal settings.
Woven Willow or Bamboo Edging
These natural materials are perfect for English cottage gardens, Asian-inspired landscapes, or eco-friendly designs—sold as pre-woven fencing, 6-12 inches tall. Installation is simple: press stakes into soil around tree perimeter at 12-18 inch intervals and weave flexible branches horizontally between them.
Willow lasts 2-4 years while bamboo can last 5-7 years depending on climate. The biodegradable nature means these borders will eventually need replacement, but they offer a charming, natural aesthetic that softens landscape transitions and complements informal garden styles.
Best applications:
- Cottage gardens with perennial borders
- Asian-inspired zen gardens
- Organic or permaculture landscapes
- Temporary borders during garden establishment
Green wood is often used for flexibility but may shrink as it dries, requiring occasional adjustment. The natural appearance blends seamlessly into garden settings, creating a soft transition that feels organic rather than imposed.
Living Edges (Groundcovers, Low Hedges, or Perennials)
A "soft edge" approach uses low-growing plants like mondo grass, liriope, boxwood, or flowering perennials planted in a continuous border around the tree. It creates a natural transition between lawn and tree bed without introducing foreign materials.
Benefits:
- No materials to purchase or install
- Adds color, texture, and seasonal interest
- Supports pollinators and beneficial insects
- Creates natural, flowing transitions
Considerations: Requires plant establishment time (typically one full growing season), ongoing trimming to maintain definition, and initial weeding until plants fill in. Unlike static materials, living edges don't provide an immediate physical barrier to grass roots, so diligent maintenance is needed during establishment.
Popular plant choices include liriope and mondo grass for evergreen borders, low boxwood for formal hedges, or flowering perennials like catmint or dianthus for cottage-style edges. Living edges works best when combined with an initial grass removal technique like sheet mulching to give plants a head start.
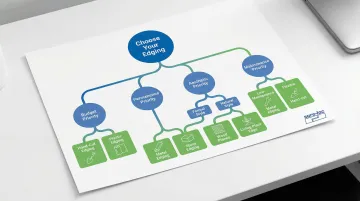
How to Choose the Right Edging Method for Your Trees
Selecting the right edging method starts with understanding your priorities. Consider your budget (free to $15/ft), desired permanence (annual maintenance vs. 20+ year solutions), landscape style (formal vs. natural), and DIY skill level.
Budget-based decision framework:
- $0: Hand-cut spade edging (high annual labor)
- $0.50-$2/ft: Plastic roll or pound-in edging (5-10 year lifespan)
- $2-$5/ft: Wood edging or woven natural materials (5-15 years)
- $4-$8/ft: Professional metal edging (20+ years)
- $6-$15/ft: Stone, brick, or masonry (permanent)
Tree size and age also influence your choice. Young trees with small beds (3-4 ft diameter) work with any method since bed size will likely expand as trees mature. Flexible, adjustable options like hand-cut edges or plastic edging allow for easy modification.
Mature trees with large beds (8-12 ft diameter) benefit from durable edging that won't need frequent replacement, since beds rarely change size once trees reach maturity.
Match your edging to your property style:
- Formal estates and commercial properties: Metal or stone edging for crisp, permanent lines
- Cottage gardens and informal landscapes: Wood, woven materials, or living edges
- Modern contemporary landscapes: Clean metal lines in aluminum or steel
- Budget-conscious homeowners: Start with spade-cut or plastic roll edging, upgrade later
Finally, consider your maintenance preferences:
- Enjoy seasonal garden work? Hand-cut edges provide flexibility and zero material cost
- Prefer set-it-and-forget-it? Professional metal or masonry edging requires no ongoing maintenance
- Want a middle ground? Plastic or wood edging needs occasional repairs but minimal upkeep
Common Mistakes to Avoid When Edging Around Trees
Placing edging too close to the trunk—closer than 6-12 inches—traps moisture against bark, causing rot and creating hiding spots for rodents and insects that damage trees.
Proper spacing should maintain the root flare visible and free of mulch contact, with edging extending to the drip line (outer edge of canopy) for proper mulch bed coverage and root protection.
One common spacing error creates what professionals call "mulch volcanoes." This happens when edging sits tight to the trunk and mulch piles high against bark—a leading cause of tree decline. Research shows this practice keeps bark permanently moist, softening it and making it susceptible to rot, insects, and rodents. Instead, edging should encompass the drip line area with mulch depth of 2-4 inches that tapers to 1 inch near trunk, leaving the root flare exposed.
Careless installation causes another frequent problem: root damage. Always dig carefully when installing edging, stopping if you encounter resistance from roots. Choose shallower edging or adjust placement rather than cutting through roots, which stresses trees and creates disease entry points.
The majority of absorptive roots are in the top 6-12 inches of soil—deep trenching for edging installation can sever these essential roots, cutting off water and nutrient supply.
Additional mistakes to avoid:
- Installing rigid edging too close to trunk, which can eventually girdle the tree as it grows
- Exceeding 4-inch mulch depth, which suffocates roots and encourages disease
- Using treated lumber directly against tree bark (maintain spacing)
- Failing to remove grass within the bed before installing edging

Conclusion
The best tree edging method balances your budget, aesthetic preferences, and maintenance willingness. Options range from annual spade-cutting (free but labor-intensive) to permanent metal or stone installations ($4-$15/ft with decades of service). Each approach has merits: hand-cut edges offer flexibility for changing bed sizes, plastic edging provides affordable barriers, wood adds rustic charm, and professional metal systems deliver maintenance-free performance.
Proper edging protects tree health by preventing lawn equipment damage, retaining beneficial mulch at consistent depths, and reducing root competition from aggressive turf grass. This makes edging an investment in your trees' long-term vitality, not just a cosmetic enhancement.
Studies confirm that mechanical damage from lawn equipment is a primary cause of urban tree decline, making protected zones essential for tree longevity.
For landscape professionals and homeowners seeking permanent solutions, commercial-grade aluminum edging systems deliver superior durability and clean lines.
Sure-loc Edging manufactures professional-grade aluminum and steel edging with features including:
- Dual stake locking systems for seamless connections
- Frost-resistant stake pocket technology
- 20+ year lifespans with minimal maintenance
- No-overlap joint design for clean installation
Frequently Asked Questions
How far should edging be placed from a tree trunk?
Maintain 6-12 inches minimum from trunk, never touching bark directly. Ideally, extend edging to the drip line (outer edge of canopy) to create adequate mulch bed and root protection zone.
What is the most cost-effective tree edging method?
Hand-cut spade edging is free but requires annual maintenance. Plastic roll edging ($0.50-$1.50/ft) balances low cost with 5-10 year durability, while professional-grade aluminum edging from manufacturers like Sure-loc offers permanent, maintenance-free performance.
Can tree roots grow through edging and cause damage?
Surface roots may eventually push against edging but rarely break through metal or masonry options. Flexible plastic may lift over time, requiring occasional adjustment. Living edges naturally accommodate root growth without resistance.
How deep should tree edging be installed?
Most edging is installed 3-5 inches deep, sufficient to prevent grass encroachment without damaging tree roots concentrated in the top 6-12 inches of soil. Deeper installation increases root damage risk.
What type of edging works best for sloped yards around trees?
Stone, brick, or terraced wood edging can be stepped to follow slope contours. Flexible metal edging adjusts to grade changes effectively. Avoid rigid materials that require extensive ground leveling, which can disturb tree roots.
Do I need to remove grass before installing edging around a tree?
Remove grass within the entire planned mulch bed area, not just at the edging line. Use a spade to remove sod or apply cardboard/newspaper layer before mulching to suppress regrowth.