Introduction
The difference between amateur and professional landscaping often comes down to one visible detail: clean, lasting borders. Research shows that professional landscaping can increase a home's resale value by 15% to 20%, with sophisticated landscape design specifically boosting perceived home value by 5.5% to 12.7%. Yet most edging installations fail within 2-3 years.
Achieving professional-grade results requires understanding soil movement, selecting appropriate materials, and mastering proper installation depth. Property owners commonly face edging that shifts during freeze-thaw cycles, grass creep under barriers, and borders that buckle within seasons.
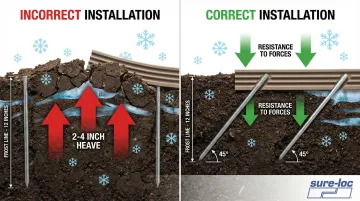
These failures stem from inadequate anchoring, using residential-grade materials for demanding applications, and ignoring frost heave—the soil movement that can displace improperly anchored edging by 2-4 inches each winter.
Key Takeaways
- Install at 4-6 inches depth with stakes at 45-degree angles to resist frost heave
- Aluminum edging lasts 20-30+ years versus 5-10 years for plastic alternatives
- Professional-grade systems prevent grass encroachment and reduce maintenance time significantly
- Success requires proper trench prep, correct staking intervals, and climate-appropriate materials
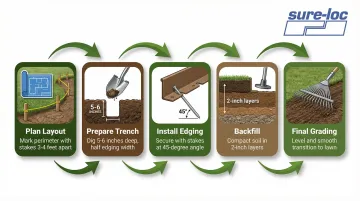
How to Create Perfect Lawn Borders: Step-by-Step Process
Step 1: Plan Your Border Layout and Design
Map out your border path before breaking ground. Use stakes and string for straight edges or garden hoses for curves, ensuring smooth transitions that simplify mowing. Avoid sharp angles that complicate maintenance and create weak points in your edging system.
Measure the total linear footage needed and add 10% for waste, cuts, and installation adjustments. Account for corners, curves, and connection points that require additional material. Accurate measurement prevents mid-project material shortages and unnecessary trips to suppliers.
Before excavating, call 811 to mark underground utilities. The service identifies:
- Electrical conduits and power lines
- Gas lines and propane feeds
- Water mains and irrigation systems
- Telecommunications cables
- Sewer and drainage pipes
Photograph existing landscape features and measure distances from property lines, structures, and permanent fixtures. Reference points ensure proper setbacks and alignment with your overall landscape design.
Step 2: Prepare the Trench and Base
Excavate a trench 5 to 6 inches deep and 4-6 inches wide along your marked line. Use a flat-edge shovel or mechanical edger to maintain consistent depth throughout the run. Industry standards recommend digging the trench 1-inch deeper than the edging height to ensure proper positioning.
Create clean vertical walls on the lawn side to prevent grass roots from finding pathways into garden beds.
Remove all grass, roots, and debris from the trench. Organic material decomposes and creates voids that compromise edging stability.
Level the trench bottom using a hand tamper or plate compactor, checking with a level every 3-4 feet. Consistent depth ensures uniform edging height above grade and prevents low spots where water can pool.
In areas with poor drainage or heavy clay soil, add 1-2 inches of compacted gravel base. The gravel prevents water accumulation and reduces frost heave risk by providing drainage pathways beneath the edging.
Step 3: Install the Edging Material
Position edging sections end-to-end in the trench, ensuring the top edge sits 1/2 to 1 inch above final soil grade. Proper height provides mowing clearance and maintains clean lines.
Staking requirements:
- Aluminum edging: Every 4 feet with manufacturer-specified stakes
- Plastic edging: Every 2-3 feet (closer spacing for stability)
- Angle: 45 degrees away from lawn for frost heave resistance
Drive stakes at the specified angle. Angled installation resists frost heave forces far better than vertical staking.
Once staked, connect adjoining sections using proper joining methods. Professional aluminum systems like Sure-loc's dual stake design create seamless connections without overlapping material. The stakes form the connection point below grade, creating invisible joints.
Check alignment every 5-10 feet using a string line or level. Make micro-adjustments before final securing—small corrections during installation prevent noticeable deviations in the finished border.
Step 4: Backfill and Finish the Installation
Backfill the lawn side first, tamping soil firmly against the edging. Lateral support prevents tipping and maintains position during ground movement.
Fill the bed side with appropriate material—mulch, stone, or soil—to within 1 inch of the edging top. Leave space for settling and future top-dressing.
Water backfilled areas thoroughly to settle soil and identify low spots. Address these depressions with additional fill before final grading—settling that occurs after project completion creates maintenance issues and compromises appearance.
Trim excess edging with appropriate tools: metal snips for aluminum and steel, utility knives for plastic. Cap exposed ends per manufacturer instructions to prevent sharp edges and provide finished appearance.
Step 5: Final Grading and Cleanup
Rake and level both lawn and bed sides of the border, creating gentle slopes away from structures for proper drainage. Water management is critical—standing water accelerates material degradation and creates conditions favorable for pest issues.
Remove all excavated soil, excess materials, and debris from the work area. Dispose of or repurpose materials according to local regulations. Professional installations leave no trace of construction activity beyond the finished edging.
Water newly edged areas again to further settle materials and check for sections that shifted during backfilling. A second watering reveals problems while fixes remain simple.
Allow 24-48 hours before mowing near new edging. The settling period allows soil to compact around stakes, preventing displacement from mower impact.
Choosing the Right Edging Material for Your Project
Material selection determines long-term performance and total cost of ownership. Compare options based on expected lifespan rather than initial price—the cheapest upfront option often costs more over time.
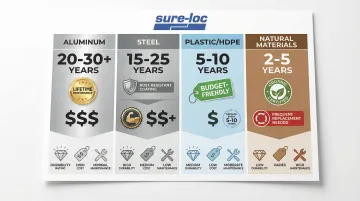
Lifespan by Material:
- Aluminum: Lifetime performance with proper installation, often exceeding 20-30 years
- Steel: Will not deteriorate or rust for at least 15 years with quality galvanization
- Plastic (HDPE): Long-term creep behavior predicted over 25 years, though typical performance ranges 5-10 years
- Natural materials: 2-5 years depending on wood species and soil contact
Climate Considerations and Material Performance
Your climate plays a major role in material performance. Freeze-thaw cycles and frost heave potential demand specific engineering solutions. Steel edging can have problems with frost heaving in winter if not installed with proper anti-heave measures, while aluminum's lighter weight and flexibility make it easier to work with in these conditions.
Professional-grade systems include features that separate them from consumer products. Sure-loc's anti-frost heave technology uses stake pockets that accept stakes at 45-degree angles to resist the upward forces generated during freeze-thaw cycles.
The invisible dual stake pocket design creates seamless, shift-resistant borders without visible hardware disrupting sight lines.
Visual impact matters in landscape design. Consider how each material aligns with your project aesthetic:
- Aluminum: Clean, modern lines for contemporary landscapes
- Steel: Industrial strength for commercial applications
- Natural stone: Traditional aesthetics for classic designs
The edging material should complement your overall design language while providing the structural performance your application demands.
Factor in long-term maintenance costs including replacement frequency, repair difficulty, and resistance to lawn equipment damage.
A $200 aluminum edging installation that lasts 25 years costs $8 annually, while a $75 plastic installation lasting 7 years costs nearly $11 annually—plus the labor and disruption of two additional replacements.
Common Lawn Edging Mistakes to Avoid
Shallow installation undermines edging effectiveness. Depths less than 4 inches let grass roots tunnel underneath into garden beds.
Consider the root depth challenge:
- Tall fescue: up to 60 inches deep in optimal conditions
- Kentucky bluegrass and Bermudagrass: 8-18 inches typically
- Professional standard: 4-6 inches minimum depth
- Aggressive grasses or cold climates: 6-8 inches recommended

Consumer-grade plastic edging fails quickly in professional settings. Heavy foot traffic, aggressive mowing, and extreme weather cause buckling and breakdown within 2-3 years.
Initial cost savings vanish when you factor in replacement labor and materials. Commercial applications need materials engineered to withstand maintenance equipment abuse and environmental stress.
Frost heave in cold climates creates annual reinstallation headaches. Vertical stakes offer no resistance to upward forces when ice lenses form in soil.
Frost heaving can be stopped or mitigated by using grooved or lip-style edging with steel anchoring stakes driven at 45-degree angles. Edging that lifts 2-4 inches each winter needs repositioning every spring—a maintenance burden that proper installation eliminates.
Maintaining Your Lawn Borders for Long-Term Success
Inspect edging twice yearly—in spring after frost events and in fall before winter. During inspections, check for:
- Sections that have shifted or tilted
- Stakes that have loosened from soil movement
- Joints that have separated or misaligned
- Damage from lawn equipment or weather
Address minor issues immediately before they require complete reinstallation.
Keep the top edge visible by maintaining proper mulch and soil levels in beds while trimming grass that attempts to grow over the barrier.
This preserved visibility maintains the clean line that defines your landscape and prevents grass from establishing footholds that compromise the barrier.
For permeable systems and hardscape edges, routine maintenance cycles should begin 6 months after installation and repeat annually. Check for sediment accumulation, edge displacement, and drainage issues that develop over time.
Professional-grade aluminum and steel systems require minimal maintenance when properly installed. Sure-loc aluminum edging never rusts, cracks, rots, or becomes brittle, providing lifetime performance with virtually no upkeep beyond periodic inspection.
Frequently Asked Questions
What are common mistakes when edging?
Insufficient depth (less than 4 inches) allows grass roots to grow underneath. Many installers use vertical stakes instead of angled stakes, leading to frost heave displacement in cold climates. Skipping the gravel base in poor drainage areas also causes long-term problems.
How deep should lawn edging be installed?
Professional installations require 4-6 inches minimum depth, with 6-8 inches recommended for aggressive grass types like Bermuda or cold climates prone to frost heave.
What is the best material for lawn edging?
Aluminum offers the best balance of durability, flexibility for curves, and maintenance-free performance with lifetime characteristics that lower long-term costs. Steel provides maximum strength for commercial applications and lasts 15-25 years with proper coating, while plastic works for budget projects but requires replacement every 5-10 years.
How do you prevent grass from growing under edging?
Install edging at least 4-6 inches deep to extend below the primary root zone. Select edging with bottom flanges or lips that block lateral root growth. Aggressive grasses may require deeper barriers or active maintenance.
Can lawn edging be installed on slopes?
Yes, using stepped installation techniques and cross-stakes for lateral stability. Bury at least 1/3 of the profile height for adequate anchoring, and use 45-degree angled staking to prevent downslope migration.
How long does professional lawn edging last?
Lifespan varies by material and installation quality: aluminum 20-30+ years with lifetime performance potential, steel 15-25 years depending on coating quality, plastic 5-10 years, and natural materials 2-5 years. Proper installation significantly impacts longevity—edging installed at correct depth with angled stakes in appropriate climates can reach or exceed these expectations.