Introduction
Edge restraint failures cost contractors thousands in callbacks and warranty claims. When installations fail within 1-3 years through paver creep, edge separation, and surface settling, the root cause traces back to precision errors in three critical areas: base preparation, material selection, and staking technique.
Professional landscape contractors and experienced hardscape installers need rigorous technique for this work. Improper installation compromises the entire paver system—edge restraints function as the structural frame that prevents lateral movement and maintains joint spacing.
According to the Interlocking Concrete Pavement Institute (ICPI), the most common installation error is insufficient base extension beyond the edge restraint. This mistake guarantees failure regardless of the restraint material used.
This guide provides the technical protocols and field-tested techniques that separate successful installations from premature failures.
Key Takeaways
- Extend compacted aggregate base 6-12" beyond paver edge to prevent restraint failure
- Match material to load: aluminum for curves, plastic for cost-effective runs, steel for vehicles
- Stake 8-10" deep (or 2" below frost line) at 12-16" intervals for straight edges, 8-10" for curves
- Install after laying pavers but before final compaction, positioned 1/8"-1/4" below surface
Understanding Paver Edge Restraints and Material Selection
Edge restraints serve as the structural frame for interlocking concrete pavement systems. They prevent lateral paver movement (creep), maintain consistent joint spacing, and transfer loads from the paver surface to the compacted base below.
Without proper edge containment, pavers shift horizontally, joints open, and the entire system loses interlock integrity.
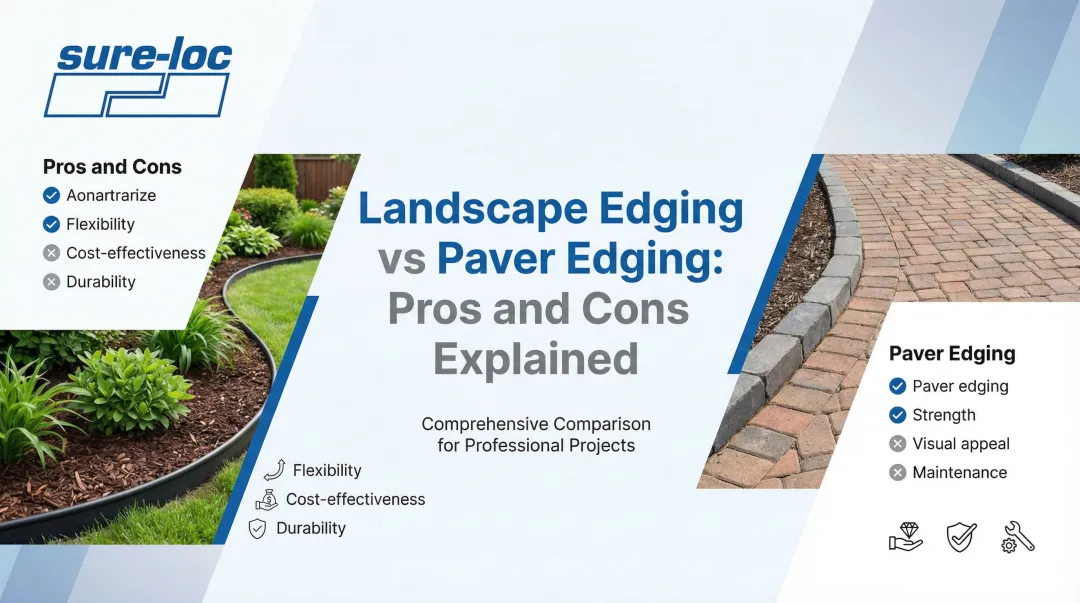
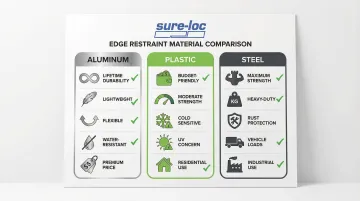
Professional-Grade Material Comparison
Aluminum Edge Restraints
Aluminum offers the best balance of performance characteristics for professional installations. Sure-loc manufactures aluminum restraints from extruded 6030 alloy that will not rust, rot, or become brittle over time.
The material bends easily by hand for curves with radii as tight as 2-3 feet, yet maintains rigidity for perfectly straight runs. This flexibility makes complex designs achievable without specialized tools.
Key advantages:
- Lifetime performance with zero corrosion
- Lightweight (easy transport and handling)
- Forms curves without heat or specialized tools
- Non-overlapping joint systems minimize material waste
- Available in multiple thicknesses (1/8" standard, 3/16" heavy-duty)
The higher upfront cost is offset by eliminating replacement cycles, making aluminum ideal for commercial projects, curved designs, and high-end residential work where permanence justifies the investment.
Heavy-Duty Plastic Edge Restraints
Professional-grade plastic restraints manufactured from 100% recycled HDPE provide cost-effective performance for many residential applications. Products like Sure-loc's plastic paver restraints accommodate moderate curves and straight runs in a single-piece design.
Key advantages:
- Lower material cost than aluminum
- Easy on-site cutting with standard tools
- Adequate strength for pedestrian traffic
- Handles light residential vehicular loads
Limitations to consider: plastic can become brittle in extreme cold (below -20°F) and may experience UV degradation if not properly backfilled with soil. The material is less rigid than aluminum, requiring closer stake spacing in demanding applications.
Plastic restraints work best for residential patios, walkways, and driveways where budget constraints exist and extreme temperature swings are uncommon.
Steel Edge Restraints
Steel provides maximum strength for heavy vehicular loads but requires powder coating or galvanization to prevent rust staining on pavers.
According to ICPI standards, steel edging should only be used on rigid bases and is difficult to form curves with radii less than 6 feet. The material's weight makes handling more labor-intensive than aluminum or plastic alternatives.
Contractors specify steel for commercial parking lots, industrial pavements, and municipal streets where 18,000+ lb equivalent single axle loads (ESALs) are expected.
Concrete Edge Restraints
Troweled concrete or soldier course (pavers set in concrete) provides economical restraint for large-scale developments.
ICPI specifications require concrete edges to be at least 6" wide and cover two-thirds of the paver and bedding sand height, extending minimum 2" into the base. While stable and cost-effective for linear applications, concrete is susceptible to cracking in freeze-thaw climates.
The material offers limited design flexibility once installed. Adjustments require demolition and replacement.
Professional-Grade Features That Matter
Once you've selected the right material for your project's load requirements and budget, focus on these engineering features that separate professional-grade restraints from big-box alternatives:
- Stake pocket design accepting angled stakes: Sure-loc's Anti Frost Heave Technology allows stakes at 45-degree angles to resist upward forces during freeze-thaw cycles
- No overlapping joints: Professional systems like Sure-loc's dual stake locking system create seamless connections without material overlap that creates weak points
- Adequate material thickness: Minimum 0.09" for aluminum (1/8"), 0.25" for plastic, with heavy-duty options at 3/16"
- UV stabilization: Critical for plastic restraints with above-ground exposure, though proper backfilling protects against degradation
Big-box store products typically lack these engineered features, resulting in shorter service life and higher failure rates.
Prerequisites and Site Assessment
Proper edge restraint installation begins before the restraint ever touches the ground. Verify these critical conditions first.
Base Preparation Standards
The aggregate base must meet specific depth and compaction requirements:
- Pedestrian applications: Minimum 4" compacted aggregate (6" in cold climates or over weak soils)
- Residential driveways: Minimum 6" compacted aggregate (8" for poor drainage or freeze-thaw zones)
- Vehicular/commercial: 8-12" compacted aggregate based on traffic loads
ICPI standards mandate 98% Standard Proctor density (ASTM D698) for pedestrian areas and 98% Modified Proctor density (ASTM D1557) for vehicular applications.
Compact aggregate in 4-6" lifts using a reversible plate compactor with minimum 7,000 lbf centrifugal force.
The bedding sand layer should be screeded to 1" uncompacted thickness conforming to ASTM C33 concrete sand specifications. Never use masonry sand or stone dust, which compromise drainage and stability.
Verify minimum drainage slope: 1.5% for standard pavements, 2% minimum for surfaces adjacent to structures.
Utility Clearance Verification
Confirm all underground utilities have been marked within the past 30 days before excavating for edge restraints.
Edge restraint installation requires driving 8-12" stakes—contact with buried electrical conduits, irrigation lines, or gas pipes creates safety hazards and expensive repairs.
Maintain 12" minimum clearance between the planned restraint path and any known utility locations.
Site Condition Assessment
Key site conditions directly affect restraint selection and installation approach:
Soil type: Expansive clays that swell when wet require deeper stake penetration and may require geomembrane barriers for permeable systems. Sandy soils drain well but provide less stake holding power, requiring closer spacing or longer stakes.
Frost depth: Frost penetration varies significantly by region. Stakes must extend minimum 2" below the local frost line to prevent heave. Consult local building codes for maximum frost depth in your area.
Traffic loads: Pedestrian-only areas can use lighter restraint systems, while vehicular edges demand concrete, steel, or heavy-duty aluminum with closer stake spacing.
Tools and Materials Required
Essential Installation Tools
- 10 lb dead blow hammer for driving stakes without damaging restraint material
- Reversible plate compactor (minimum 5,000 lbf for paver compaction, 7,000 lbf for base prep)
- String line and line level for maintaining alignment over long runs
- Hand tamper for edge zone compaction in tight spaces
- Measuring tape (25' minimum length)
- Safety glasses and work gloves (required PPE)
Required Materials Beyond Restraints
- Galvanized steel spikes (10" length minimum, 3/8" diameter)
- Additional base aggregate (1 cu ft per 10 linear feet for edge zone backfill)
- Construction adhesive (optional): Polyurethane-based for permanent paver-to-restraint bond in high-stress areas
Specialized Tools for Quality Installation
- Circular saw with masonry blade for cutting pavers to fit complex edges
- Rubber mallet for fine adjustments without damaging paver surfaces
- Speed square for verifying perpendicular corners
- Tin snips for cutting aluminum restraints to fit custom corners
Professional Installation Process (Step-by-Step)
Edge restraint installation follows a specific sequence: always after base preparation and paver laying, but before final compaction and joint sand application.
Installing restraints first makes achieving tight paver-to-restraint fit impossible, leading to gaps and sand loss.
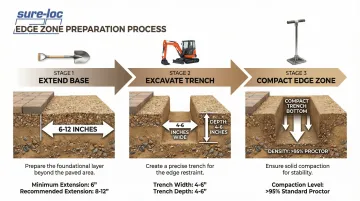
Base Preparation and Edge Zone
The edge zone is the 6-12" wide area beyond the paver perimeter where the restraint anchors. ICPI standards require extending the compacted aggregate base beyond the edge restraint by a distance equal to the base thickness (minimum 6").
Step 1: Extend the base Spread aggregate base material 6-12" beyond the final paver edge. For a 6" thick base, extend the base 6" beyond where stakes will be driven. This prevents the restraint from sinking into soft soil.
Step 2: Excavate the edge trench Dig a trench 4-6" wide along the paver perimeter. Position the depth to place the restraint top 1/8"-1/4" below the paver surface after installation. For a 2.5" tall paver with 1" bedding sand, a trench 2-3" deep typically achieves correct positioning.
Step 3: Compact the edge zone Use a hand tamper to compact the trench bottom and extended base area. Make 3-4 passes until the surface is firm with no visible movement under tamper pressure. Loose material in the edge zone allows restraints to shift over time.
Setting the Edge Restraint
With the base prepared and compacted, you're ready to position the restraint system.
Step 4: Establish starting point Begin at a fixed reference—building corner, sidewalk intersection, or property line. Working from a permanent feature maintains alignment and prevents positioning errors that compound over long runs.
Step 5: Position restraint against pavers Place the edge restraint tight against the paver edge with the top sitting 1/8"-1/4" below the paver surface. This slight reveal is intentional: restraints flush with or above pavers interfere with final compaction and create tripping hazards.
For products like Sure-loc's aluminum restraints with V-notch bases, the material bends easily by hand to follow curves.
Create 90-degree corners by cutting 45-degree angles on each section and overlapping at the corner, or use the material's flexibility to form gentle radius corners.
Step 6: Verify height before staking Use a straightedge across multiple pavers to confirm restraint height. Correcting height after staking requires removing stakes and re-excavating—time-consuming and costly.
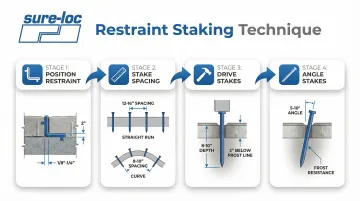
Staking and Securing
Once positioned correctly, secure the restraint with proper staking technique.
Proper staking is the difference between restraints that last decades and those that fail within seasons.
Step 7: Drive stakes at correct spacing Professional installations use these spacing intervals:
- Straight runs: 12-16" on center
- Curves: 8-10" on center
- Corners and high-stress points: 6-8" on center
Drive stakes through the restraint's stake pockets using a dead blow hammer. For Sure-loc aluminum restraints requiring 10" steel spikes with 3/8" diameter, drive stakes to full 8-10" depth or 2" below local frost line, whichever is deeper.
Step 8: Angle stakes for frost resistance Angle stakes 5-10 degrees outward (away from pavers) to resist frost heave forces that push upward and outward during freeze-thaw cycles. Sure-loc's Anti Frost Heave Technology incorporates stake pockets designed to accept stakes at 45-degree angles for maximum holding power.
Step 9: Verify stake seating Each stake must be fully seated in its pocket before moving to the next position. Partially driven stakes allow the restraint to lift and separate from pavers.
Connecting Sections and Corners
Step 10: Join restraint sections For aluminum systems with dual-stake connectors (like Sure-loc's system), ensure connector stakes engage both sections fully.
The dual stake locking system creates seamless connections without overlapping material.
For plastic systems, use manufacturer-supplied couplers or overlap sections by 6" with stakes through both pieces.
Step 11: Form 90-degree corners Cut one restraint section at 45 degrees and the perpendicular section at 45 degrees, overlapping at the corner. Secure with stakes through both pieces at the corner and 6" on either side. For aluminum restraints, the material's flexibility allows creating 90-degree angles as often as every 4" without cutting.
Step 12: Create radius corners For corners gentler than 90 degrees, bend the restraint gradually rather than forcing sharp angles. Tight-radius curves require additional stakes on the outside of curves (every 8-10" instead of 12-16") to prevent the material from bowing outward.
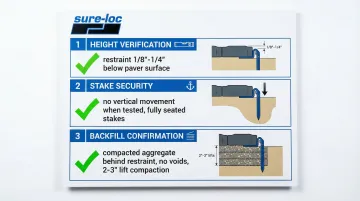
Post-Installation Validation
Three verification checks confirm proper installation before proceeding to joint sand application.
Height Verification
Walk the entire perimeter with a straightedge, checking that the restraint sits 1/8"-1/4" below the paver surface at all points. This positioning is critical:
- Too high: Restraints will be damaged during final compaction
- Too low: Won't contain bedding sand effectively, causing edge settlement
Stake Security Check
Test the installation's stability by attempting to lift the edge restraint at multiple points. Properly driven stakes should prevent any vertical movement.
The restraint should feel solidly anchored with no flex or give when pulled upward.
Backfill Confirmation
The final check ensures long-term stability of the restraint system:
- Fill behind restraint with compacted aggregate or native soil
- Never use loose material or organic matter
- Eliminate all voids to prevent backward movement
- Compact backfill in 2-3" lifts to match base density
Common Installation Problems and Solutions
Edge Restraint Sits Too High After Installation
Problem: Restraint extends above paver surface, causing plate compactor to catch or damage the edge during final compaction.
Cause: Insufficient excavation depth in edge zone trench, or base aggregate not compacted before restraint placement.
Solution:
- Remove restraint and stakes, then excavate trench deeper by 1/2"-1"
- Re-compact base thoroughly before reinstalling restraint
- Verify height is flush with or slightly below paver surface before re-staking
- Alternative: If stakes have penetration room remaining, drive them deeper to pull restraint down (only works if stakes aren't at maximum depth)
Another common challenge appears after compaction is complete.
Pavers Separate from Edge Restraint After Compaction
Visible gaps between paver edge and restraint allow sand loss and weed growth.
Causes:
- Edge restraint installed before final paver compaction, causing pavers to settle away
- Insufficient stake density allows restraint to flex outward
Solution:
- Remove several pavers adjacent to the gap
- Pull restraint tight against remaining pavers and add stakes every 8-10" in gap area
- Replace pavers tight against restraint, then compact thoroughly
- For persistent gaps, apply construction adhesive between restraint and paver edge
Stake installation itself can present obstacles during the process.
Stakes Won't Drive to Full Depth
Stakes that stop penetrating at 4-6" depth leave restraint inadequately anchored.
Common causes include:
- Large aggregate in base material blocking penetration
- Hardpan or clay layer beneath installation zone
- Stakes bending due to incorrect driving angle
Solution:
- Remove bent stake and drill pilot hole through obstruction using 3/8" masonry bit
- Drive new stake through pilot hole for full penetration
- If hardpan is consistent throughout edge, switch to shorter stakes (6" minimum) but increase frequency to every 8-10"
- Ensure stakes are driven perpendicular to ground, not angled severely
Curved sections require special attention to prevent common failures.
Edge Restraint Pulls Away from Pavers in Curves
On curved sections, restraint bows outward creating gaps, especially on tight radius curves.
Cause: Insufficient stake density on curves (using same 12-16" spacing as straight runs), or attempting radius tighter than material's minimum bend capability.
Solution:
- Add stakes every 8-10" on outside of curve
- For very tight curves, increase to every 6" spacing
- If radius exceeds material's bend capability, switch to more flexible material (aluminum bends tighter than plastic) or redesign with gentler radius
- Aluminum restraints like Sure-loc's systems use a V-notch base design that accommodates curves easily when properly staked
Even with restraint installed, sand loss can occur if positioning and backfill aren't correct.
Joint Sand Escapes at Edge Despite Restraint
Problem: Polymeric or regular joint sand washes out or spills over edge even with restraint installed.
Causes:
- Restraint sitting too low (more than 1/2" below paver surface), creating channel for sand escape
- Inadequate backfill behind restraint allows sand to migrate
Solution:
- Ensure restraint is no more than 1/4" below paver surface
- Install a second "shadow" restraint 2-3" behind the first to create sand containment zone
- Backfill area between restraints with crusher fines or sand to lock in joint sand
- Industry installation guidelines recommend geotextile fabric turned up against restraint to prevent bedding sand migration
Pro Tips for Long-Lasting Results
Professional installers rely on these field-tested techniques to eliminate callbacks and ensure long-term performance:
Order 10% extra edge restraint material and 20% extra stakes beyond calculated needs. Field adjustments, mistakes, and unforeseen site conditions use up materials quickly. Running short mid-installation delays projects and may require ordering from different production lots with slight color variations.
Apply polyurethane construction adhesive in high-stress areas such as vehicular traffic zones or high-end residential installations. Apply to the back of the edge restraint before staking to create a permanent paver-to-restraint bond. This adds $0.50-$1.00 per linear foot but eliminates movement and callbacks.
Extend stakes at least 2" below the local frost line in regions with freeze-thaw cycles. Angle them 5-10 degrees outward to resist frost heave forces. This prevents 90% of edge restraint failures in cold climates.
Document installation at three stages: before staking (showing trench depth and base extension), after staking (showing stake spacing and penetration), and after backfill (showing completed edge zone). These photos provide evidence of proper installation if warranty claims occur, protecting your reputation and limiting liability.
Frequently Asked Questions
What to edge a paver patio with?
Choose aluminum restraints for curved, high-end applications requiring lifetime performance, heavy-duty plastic for cost-effective residential installations, or steel for commercial driveways and high-traffic areas. Material selection depends on budget, design complexity, and expected loads.
Can I install edge restraints before laying pavers?
No—install edge restraints after laying and initially compacting pavers, but before applying joint sand. Installing restraints first creates gaps between pavers and restraint, allowing sand loss and weed growth.
How deep should stakes be driven for paver edge restraints?
Drive stakes 8-10 inches below grade in temperate climates, or 2 inches below the frost line in cold climates (whichever is deeper). Shallow penetration allows frost heave to lift restraints, causing failure within 1-3 years.
What spacing should I use between stakes on edge restraints?
Use 12-16 inch stake spacing on straight runs, 8-10 inches on curves, and 6-8 inches at corners and high-stress points. Closer spacing prevents bowing and improves restraint stability.
Why is my edge restraint visible above the paver surface?
Restraints should sit 1/8"-1/4" below the paver surface—this slight reveal is correct. Restraints flush with or above pavers indicate insufficient trench depth and create tripping hazards that will be damaged during compaction.
Do I need different edge restraints for permeable vs. standard pavers?
Yes—permeable paver installations require edge restraints with drainage provisions to maintain water flow. Use open-graded aggregates and geotextile fabric along restraint edges to prevent soil migration while preserving drainage.