Introduction
A crisp driveway edge separates weekend lawn maintenance from professional landscaping results. That clean boundary between grass and pavement instantly elevates curb appeal—research shows well-maintained landscapes can increase perceived property value by 10-15%.
While edging appears straightforward, achieving sharp, lasting edges requires understanding surface differences (asphalt vs. concrete), proper tools, and correct technique.
Many homeowners cut too shallow or at the wrong angle, allowing grass to creep back within days.
This guide covers:
- Professional techniques for creating and maintaining sharp edges
- Choosing the right tools for hard surfaces
- Avoiding common mistakes that compromise results
- Installing permanent solutions that reduce ongoing maintenance
Key Takeaways
- Create a 2-3 inch deep trench angled away from driveway to block grass roots from spreading under pavement
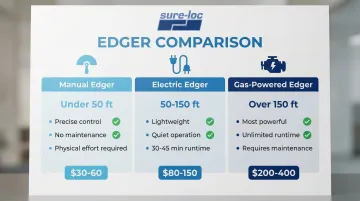
- Match your tool to driveway length: manual edgers under 50 feet, electric 50-150 feet, gas-powered for longer runs
- Mow first, then edge when soil is slightly moist but grass blades are dry (ideally day after rain)
- Edge every 2-3 weeks during peak growth, every 4-6 weeks during slower periods
- Permanent edging cuts ongoing maintenance by 80-90% with lifetime performance
How to Edge a Lawn Along Driveway: Step-by-Step
Step 1: Prepare the Driveway Edge Area
Mow first. This isn't optional—mowing before edging allows you to see the exact boundary between grass and driveway. Trying to edge before mowing obscures your sight line and causes clippings to fall onto your freshly cut edge.
Clear the work area by walking the entire driveway perimeter and removing:
- Rocks, sticks, and debris (edger blades can throw objects at 200 mph)
- Bottles, cans, and wire that could damage equipment
- Sprinkler heads, landscape lighting, and utility line markers
Call 811 at least two days before starting if you're creating a new edge. Even shallow landscaping work can damage buried utilities, and verification is free.
Inspect your driveway surface for settled areas, cracks, or uneven sections.
Edge along the highest consistent point rather than following dips that could create drainage problems.
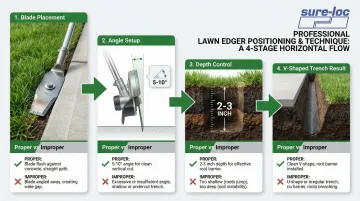
Step 2: Position and Angle Your Edger Correctly
Place your edger blade directly against the driveway edge with wheels on the paved surface. The wheels provide stability and guidance for a straight, consistent cut.
Angle the blade 5-10 degrees away from the driveway. You'll create a shallow V-shaped trench that prevents grass roots from growing horizontally under the pavement edge. Professional standards call for a V-shaped trench 4-6 inches deep for manual edging, though 2-3 inches suffices when installing permanent landscape edging (metal or plastic barrier systems).
Manual edger technique:
- Position your body to apply downward pressure while maintaining the angle
- Use your foot on the platform to drive the blade into soil
- Keep the cutting edge flush against the pavement
Power edger technique:
- Let the machine's weight do the cutting work
- Adjust blade angle to avoid nicking concrete (damages the blade and creates hazards)
- Run wheels on the smooth surface for even cuts
Start at one end and work systematically toward the other, maintaining consistent depth throughout.
Step 3: Create the Initial Cut and Remove Excess Material
Make your first pass along the entire driveway length, cutting 2-3 inches deep. At this depth, you'll sever grass roots completely—anything shallower allows quick regrowth onto the driveway within days.
If you're working with overgrown edges, make a second pass to widen the trench and ensure complete separation between lawn and pavement.
Remove the cut strip immediately. Use a flat shovel or garden spade to lift out the severed grass and soil, creating a clean gap. Leaving cut material in place defeats the purpose of edging.
Sweep or blow debris off the driveway surface right away. Grass clippings and soil left on concrete or asphalt can stain and create a messy appearance that undermines your clean edge work.
Step 4: Refine the Edge and Establish Maintenance Schedule
Walk the completed edge and hand-trim any remaining grass blades or roots the edger missed. These stragglers are most common around obstacles or in areas where the edger couldn't maintain full contact with the surface.
Match your technique to the surface:
- Concrete driveways: Follow the concrete edge precisely for clean, geometric lines
- Asphalt driveways: Create a straight line that accounts for irregular asphalt edges, sometimes cutting slightly inside the asphalt line to maintain visual straightness
Document problem areas during this inspection—low spots where water pools, sections with aggressive grass growth, or areas where the driveway has settled. These spots need targeted attention during future maintenance sessions.
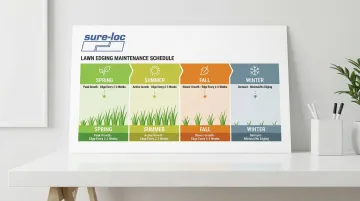
Establish your maintenance schedule based on grass growth:
- Peak growing season (spring/summer): Edge every 2-3 weeks
- Slower growth periods (late summer/fall): Edge every 4-6 weeks
- Dormant season: Minimal to no edging required
For contractors working on commercial properties or homeowners seeking a permanent solution, professional-grade aluminum or steel landscape edging eliminates the need for frequent re-edging by creating a durable physical barrier between lawn and hardscape.
When Should You Edge Your Lawn Along the Driveway?
Timing affects both ease of work and quality of results. Edge at the wrong time, and you'll create more work with poorer outcomes.
Optimal soil conditions: Edge when soil is slightly moist—ideally the day after light rain or watering. Dry soil is too hard, creates dust, and makes precise cuts difficult. Overly wet soil clumps and clogs equipment, producing messy, uneven cuts. The sweet spot is damp soil with dry grass blades on top.
Seasonal timing:
- Spring: Prime time for edging. Soil moisture and climate are ideal for establishing robust edges as grass roots begin growing
- Summer: Trickier due to dry soil. Wait for rain or water the area the evening before
- Fall: Mow and edge neatly before the first killing frost to maintain appearance through winter
- Winter: Avoid edging during dormancy—it can damage roots without providing benefits
Time of day matters, too. Edge in morning or evening when grass blades are dry but soil retains moisture. Avoid midday heat, which stresses both operator and equipment while making soil harder to work.
Spring is the best season overall—the earth softens, grass growth accelerates, and conditions are ideal for creating edges that will hold throughout the growing season.
Tools and Materials You Need
Your tool choice depends on four factors: driveway length, surface type, how often you'll edge, and your physical capability.
Edger Types for Driveway Work
Manual edgers (half-moon or rotary):
- Best for driveways under 50 feet
- Precise control, no maintenance, quiet operation, zero fuel costs
- Requires physical effort and works slower for large areas
- Fiskars Steel Long-handled Edger includes 14-gauge hardened steel blade and large foot platform for digging power
- Rotary types excel on concrete edges where precision matters
Electric/cordless edgers:
- Best for medium driveways (50-150 feet)
- Lightweight, quiet, easy to start, effective for established edges
- Corded models limited by extension cord length; cordless models run 30-45 minutes per charge
- Black+Decker LE750 has 12-amp motor and converts from edger to trencher
- Ideal for homeowners maintaining established edges regularly
Gas-powered edgers:
- Best for long driveways (over 150 feet) and professional use
- Most powerful option—handles overgrown edges, compacted soil, unlimited runtime
- Requires regular maintenance, produces emissions, heavier and louder than electric models
- Echo PE-225 includes 21.2 cc 2-stroke engine and open-faced debris shield
- Essential for commercial applications, creating new edges, or tackling severely overgrown areas
Supporting Tools and Safety Equipment
Beyond the edger itself, you'll need a few supporting items to complete the job efficiently.
- Flat shovel or spade for removing cut grass strips
- Stiff broom or leaf blower for cleanup
- Garden hose for wetting dry soil before edging
- Hacksaw for cutting materials like aluminum or steel edging sections (professional-grade landscape edging provides permanent definition once the initial edge is established)
Safety equipment is essential—edger blades can turn debris into projectiles traveling at dangerous speeds:
- Safety glasses or goggles to protect against flying debris
- Closed-toe shoes with good traction (sturdy boots recommended)
- Hearing protection for gas-powered equipment
- Work gloves for manual edgers and material handling
- Long pants to protect legs from debris
Common Mistakes When Edging Along Driveways
Even experienced landscapers fall into these traps when edging along driveways:
Edging before mowing creates two problems. First, grass clippings fall onto your freshly edged area, hiding the clean line you just created. Second, you can't see the true boundary between grass and driveway when tall grass covers the edge.
Always mow first, then edge as the finishing touch.
Cutting too shallow (less than 2 inches deep) fails to sever grass roots completely. Grass roots grow horizontally and can easily cross a shallow cut, allowing regrowth onto the driveway within days.
Proper depth—2-3 inches minimum, 4-6 inches for manual trenching—prevents grass from creeping back under pavement edges and reduces maintenance frequency.
Inconsistent angle or depth creates a wavy, unprofessional-looking edge and allows water to pool in low spots. Professional results require maintaining steady angle and depth throughout the entire run.
Use the driveway surface as a guide, keeping your edger wheels on the pavement for consistent results.
Ignoring driveway surface differences leads to poor outcomes. Concrete edges are straight, stable, and easy to follow. Asphalt edges can be irregular, crumbling, or uneven—requiring adapted technique.
For asphalt, sometimes you need to create your edge slightly inside the asphalt line to maintain a straight appearance rather than following every irregularity in the pavement.
Nicking concrete or asphalt damages your blade and creates safety hazards. Learn the angle of your curb and adjust blade positioning to avoid contact.
Damaged blades can throw dangerous fragments during operation.
Working with wrong soil moisture makes the job harder. Completely dry soil is rock-hard and creates dust, making precise edges nearly impossible. Saturated soil creates messy, uneven cuts and clogs equipment.
The ideal condition is "slightly moist"—soil should have enough moisture for easy cutting, but grass blades should be dry.
Installing Permanent Edging After Initial Cut
While manual edging creates immediate results, installing permanent edging eliminates most future maintenance and provides lasting definition. Temporary solutions end here—professional-grade installations begin.
Why Permanent Edging Makes Sense for Driveways
Permanent edging creates a physical barrier that prevents grass roots from growing under or onto driveway surfaces. The result: reduced maintenance from every 2-3 weeks to once or twice per season—a significant time and labor savings.
Temporary plastic barriers fail under driveway conditions:
- Become brittle from UV exposure
- Break under repeated mower impacts
- Crack during freeze-thaw cycles
- Warp from driveway heat
Professional-grade materials resist all of these without cracking, warping, or becoming brittle.
Research shows weathering steel edging can last 50-100+ years, while aluminum edging provides lifetime performance when properly installed. Over 5-10 years, permanent solutions prove more cost-effective than repeated manual edging labor.
Professional-Grade Edging Solutions
Aluminum edging systems designed for landscape professionals offer proprietary features unavailable in consumer-grade products. The dual-stake locking system creates seamless connections with no overlapping joints—critical for maintaining clean sight lines along driveway edges.
Two stakes positioned below grade connect adjacent sections, creating a permanent mechanical lock while remaining completely invisible after installation.
Anti-frost heave technology prevents the lifting and shifting common in climates with freeze-thaw cycles. Stake pockets accept stakes at 45-degree angles, helping keep edging in the ground when temperature changes cause ground shifting.
Driveway applications make this especially critical—displaced edging creates both aesthetic and functional problems.
For demanding driveway applications, commercial-grade options include:
- 3/16" aluminum edging: Specifically designed for high-traffic areas, driveways, and asphalt applications
- Steel edging (3/16" to 1/4" thickness): Provides maximum strength for commercial applications with high-quality powder coating that resists pH swings in alkaline soils
- Shot blast surface preparation: Advanced three-stage process that removes impurities, applies phosphoric acid coating for adhesion, and powder coats for lasting protection
Steel edging with proper coating won't chip or fade like spray-applied finishes, maintaining appearance through years of maintenance equipment contact and exposure to automotive fluids, road salt, and weather extremes.
Installation Considerations
Install permanent edging immediately after creating your initial manual edge. The fresh trench provides the ideal shape, depth, and angle for edging placement. Waiting means the trench walls may collapse or compact, requiring additional work.
For driveway applications, edging should sit flush with or slightly below the paved surface. Proper placement allows mower wheels to roll on pavement while blades trim grass cleanly against the barrier—the key to efficient maintenance.
Consider professional consultation for long driveway runs where slight errors compound into noticeable problems. Manufacturers like Sure-loc Edging provide technical support and detailed installation specifications to ensure proper placement and long-term performance.
Permanent edging made from recycled aluminum or steel offers environmental benefits while providing the structural integrity needed for driveway applications. These materials handle vehicle loads, temperature extremes, and chemical exposure while requiring minimal maintenance over their lifetime.
Frequently Asked Questions
How do professionals edge lawns?
Professionals use commercial-grade gas-powered edgers and always edge after mowing. The key difference is consistency—maintaining steady 2-3 inch depth with a uniform outward angle throughout. Many install permanent edging systems like aluminum or steel landscape edging to reduce ongoing maintenance labor.
Do you mow first or edge first?
Always mow first, then edge. Mowing first lets you see the true boundary line without tall grass obscuring it, and prevents clippings from falling onto your freshly edged area. This sequence also prevents scalping and ensures consistent edge height.
What is the best time to edge my lawn?
The optimal time is when soil is moderately moist but grass blades are dry—typically the day after light rain or watering. Edge in morning or evening rather than midday heat. Avoid edging during drought, heavy rain, or winter dormancy.
What are common mistakes when edging?
Common mistakes include cutting too shallow (less than 2 inches), maintaining inconsistent depth that creates wavy lines, edging before mowing, working with wrong soil moisture, and using dull blades. Hitting concrete or asphalt with the blade damages equipment and creates safety hazards.
Should you edge your lawn wet or dry?
The ideal condition is "moderately moist"—soil with enough moisture for easier cutting, but dry grass blades. Completely dry soil is too hard, while wet grass clumps and clogs equipment. Edge the day after rain when grass has dried but soil retains subsurface moisture.
How do I handle uneven or settled driveway edges?
Fill severe depressions with soil and compact lightly before edging. Edge along the highest consistent point rather than following every dip—this prevents water pooling and maintains visual straightness. For significantly settled sections, adjust placement inside the driveway line to create a straight appearance.
Word count: 2,847 words