Introduction
Sloped terrain creates accelerated soil erosion, concentrated water runoff, and installation challenges that can compromise both edging integrity and tree health. While tree edging enhances landscape aesthetics and prevents mulch washout on flat ground, slopes demand specialized techniques that account for grade and drainage.
Research shows that unprotected slopes exceeding 20% grade can experience soil loss rates of up to 12 tons per acre annually, even with standard mulch coverage.
Trees themselves concentrate rainfall through stemflow (water running down the trunk), potentially creating erosion rates of 3.8 tons per hectare per year directly at the trunk base—exactly where edging must remain stable.
This guide covers:
- When slope edging is appropriate for your project
- Site assessment techniques for grade and drainage conditions
- Step-by-step installation methods that account for slope stability
- Material selection criteria for sloped applications
- Common pitfalls that lead to edging failure on slopes
Key Takeaways
- Slopes over 15% require modified installation: deeper trenching on the downslope side, closer stake spacing, and angled staking for superior holding power
- Aluminum edging outperforms rigid materials on slopes with flexible staking, corrosion resistance, and terrain adaptability
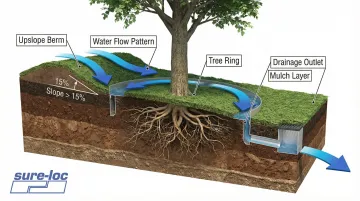
- Proper drainage management is critical—create water flow patterns around (not through) the tree ring to prevent waterlogging and edging undermining
- Bury 40-50% of edging height, stake every 2-3 feet (not 3-4), and compact backfill to 90-95% density
- Slopes exceeding 30% often require terracing or alternative stabilization methods rather than single-level edging
How to Edge Trees on Slopes
Step 1: Assess the Slope and Plan Your Approach
Measure the slope grade using the rise-over-run method: divide vertical elevation change by horizontal distance, then multiply by 100 for percentage. A 6-foot rise over 100 feet of horizontal distance equals a 6% slope. Slopes exceeding 15% (approximately 8.5 degrees) require modified installation techniques, while slopes approaching 30% are considered too steep for standard mowing and may need alternatives to traditional edging.
Identify water flow patterns by observing how rain moves across the slope during wet weather. Note where water naturally channels and accumulates around the tree. Mark the upslope side (where water originates) and downslope side (where runoff exits) to plan drainage management strategies.
Mark your edging perimeter using stakes and string, following the slope's natural contour rather than fighting against it. For most trees, extend the radius to or slightly beyond the drip line—2-4 feet from young tree trunks and further for mature specimens.
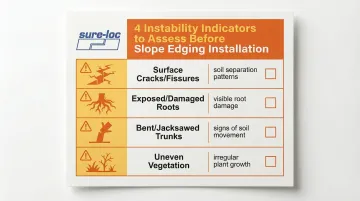
Check for instability indicators before installation:
- Surface cracks, scarps, or fissures in the soil
- Exposed or damaged tree roots
- Bent or "jacksawed" tree trunks indicating active soil creep or previous ground movement
- Areas where vegetation is sparse or uneven
Step 2: Prepare the Slope and Create a Level Base
Remove vegetation carefully in a 6-8 inch band where edging will be installed, working outward from the tree trunk. Stay outside the Critical Root Zone—about 1.3 feet of radius for every inch of trunk diameter—to avoid root damage.
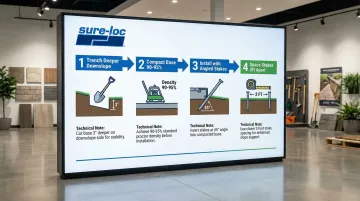
Excavate a trench that accounts for slope dynamics. Professional standards recommend burying at least 40-50% of the edging height on slopes, increasing depth on steeper grades. The trench should be deeper on the downslope side to keep the top edge level, or follow the natural contour if terracing. Measure depth perpendicular to the slope, not vertically, for consistency.
Add leveling material to create a stable foundation:
- Use more sand or granular base on the downslope side to compensate for grade differences
- Compact the base to 90-95% of Standard Proctor Maximum Density
- Proper compaction prevents settling that causes edging failure
Test for level or consistent grade across multiple points using a line level or laser level. Adjust sand depth until you achieve either a level installation (for horizontal edging) or a consistent grade that follows the slope naturally.
Step 3: Install the Edging with Slope-Appropriate Staking
Start at the upslope side where ground is most stable. Place edging sections in the prepared trench, ensuring the radius side faces up and connections are flush.
Drive stakes at appropriate angles for your slope grade. While some sources recommend 45-degree angled staking, engineering analysis shows vertical staking provides superior resistance to lateral loads by maximizing frictional shear stress.
Edging systems with adjustable stake pockets allow 45-degree insertion specifically designed to resist ground shifting from temperature changes. Sure-loc's Anti Frost-Heave Technology uses this approach, making it particularly effective on slopes prone to freeze-thaw cycles.
Space stakes closer together than flat-ground installations. Standard spacing of 3-4 feet is insufficient for slopes; reduce to every 2 feet on center for slope applications. In clay-rich soils prone to expansion and contraction, maintain 24-inch spacing throughout.
Use extended stakes for challenging slopes. Standard stakes may be inadequate; 12-inch or 18-inch stakes provide additional anchoring depth essential for stability on steep elevations and sandy soils.
Step 4: Address Drainage and Erosion Control
Create water management features to redirect flow. Construct a small berm on the upslope side to channel water around the tree ring rather than funneling it directly through. Berms work best when placed perpendicular to sheet flow with ends turned upslope to prevent bypass. On slopes exceeding 10%, effectiveness diminishes significantly.
Balance containment with drainage on the downslope side. Edging height must be sufficient to contain mulch but shouldn't create a dam that traps excessive water. Research shows tree pits can capture stormwater at three times the rate of canopy interception, so drainage is critical to prevent waterlogging.
Add erosion control measures for steep grades. On slopes exceeding 20%, install erosion control fabric or additional staking on the downslope side to prevent soil washout beneath the edging. Consider erosion control blankets as an alternative to standard mulch on moderate to steep slopes.
Plan water outlets at the lowest point to prevent pooling inside the ring. Leave small gaps or install drainage solutions that allow water to exit without carrying soil and mulch with it.
Step 5: Backfill, Mulch, and Secure the Installation
Backfill behind the edging on the upslope side with excavated soil, tamping firmly to eliminate air pockets. Proper compaction provides critical support against downslope soil pressure.
Mound and compact soil against the back of the edging on the downslope side. This prevents the edging from tipping forward over time as gravity and water flow exert pressure. Inadequate compaction is a primary cause of slope edging failure.
Add mulch to appropriate depth (2-4 inches inside the ring), keeping it 2-4 inches away from the trunk flare to prevent bark rot and girdling roots. Avoid piling mulch against the downslope edging where it can create additional pressure.
Conduct final inspection by checking that stakes are secure, edging remains stable when pressed firmly, and water flows around rather than under the edging during your first rain event.
When Should You Edge Trees on Slopes
Consider slope edging when:
- Active erosion is occurring around the tree base, exposing roots or creating unstable soil conditions
- Mowing on the slope is dangerous, impractical, or results in scalped turf around the tree
- You want to create a defined mulch bed that prevents soil and mulch from washing downslope during rain events
- The tree is located on a moderate slope (under 25%) where proper installation techniques can ensure stability
Avoid edging on slopes when:
- Grades exceed 30-35% (approximately 1:3 ratio) where installation becomes unsafe and maintenance impractical
- Soil instability indicators appear—cracks, active erosion, bent trees—suggesting the slope needs stabilization before edging
- Slopes exceed 45 degrees, which generally requires retaining walls or bioengineering solutions rather than simple edging
Optimal Installation Timing
Timing matters for installation success. Early spring and early fall offer ideal conditions when soil is workable but not rock-hard or frozen. Avoid installation during rainy periods when saturated soil increases instability and makes proper compaction impossible.
Never attempt installation when ground is frozen. Clean trenching becomes impossible and stakes won't achieve proper depth—compromising the entire edging system.
What You Need Before Edging Trees on Slopes
Equipment and Tools
For sloped terrain, aluminum or steel edging with flexible staking systems significantly outperforms rigid plastic. Aluminum provides 25+ year lifespan with superior corrosion resistance, while plastic shifts gradually under constant slope loads and becomes brittle from UV exposure.
Professional-grade systems like Sure-loc's aluminum edging offer adjustable stake pockets that allow anchoring at optimal angles—critical for maintaining stability on slopes.
Stakes and installation tools:
- Extended stakes (12-18 inches) for deeper anchoring on slopes
- Rubber mallet or stake driver for proper insertion
- Edging systems with adjustable stake pockets for optimal positioning
Measuring and leveling equipment:
- Line level or laser level for checking grade consistency
- Measuring tape for calculating slope percentage
- Stakes and string for marking perimeter
Site Preparation Materials
Foundation and stabilization needs for slopes:
- Leveling sand—purchase 30-50% more than flat-ground installations due to grade compensation
- Erosion control fabric for slopes exceeding 20% grade
- Quality mulch for the finished bed (2-4 inch depth)
Excavation tools you'll need:
- Flat spade or trenching shovel for clean cuts
- Edging tool for defining trench lines
- Wheelbarrow for moving excavated soil
- Tamping tool or compactor for achieving proper density
Common Mistakes When Edging Trees on Slopes
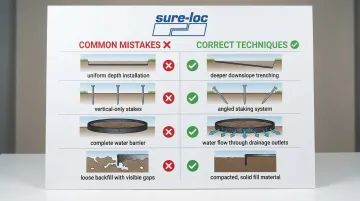
Avoid these four critical errors that compromise stability and aesthetics:
Uniform depth installation — Installing at the same depth around the entire tree creates edging that appears uneven and becomes unstable. The downslope side requires deeper trenching to maintain consistent top-edge height and prevent tipping as soil settles.
Vertical-only staking — Using straight vertical stakes exclusively reduces holding power on slopes. While vertical staking resists lateral loads in stable conditions, slopes benefit from systems that allow angled stakes (particularly 45-degree capability) to resist ground shifting from frost heave and thermal cycling.
Complete water barriers — Creating a sealed ring that traps runoff inside the tree area leads to waterlogged soil and potential root rot. The upslope side often requires berms to redirect flow around the ring, while the downslope side needs drainage outlets to prevent the "bathtub effect."
Inadequate backfill compaction — Loose soil settles and shifts, especially on the downslope side where gravity accelerates the process. Failing to achieve 90-95% Standard Proctor Maximum Density per NYC DDC specifications creates voids that compromise stability and cause the edging to tip or shift within months.
Alternatives to Traditional Edging on Slopes
Terracing with Retaining Materials
When It's Better: Slopes between 15-30 degrees (27-58%) where single-level edging proves impractical or unstable. Professional guidance recommends terracing techniques that create level "benches" rather than attempting continuous slope installation.
Key Trade-Offs: Requires significantly more labor and materials upfront, along with engineering considerations for retaining wall construction.
Terracing creates stable planting zones that are easier to maintain long-term and eliminates many drainage challenges inherent in sloped edging. The initial investment pays dividends through reduced maintenance and superior plant health.
Natural Stone or Boulder Borders
When It's Better: Rustic landscapes or very steep grades (approaching 30%+) where traditional edging would require excessive staking and still risk failure. Stone borders provide natural appearance that blends seamlessly with sloped terrain.
Key Trade-Offs: Substantially heavier and more labor-intensive to install, requiring careful placement and often professional assistance.
Properly installed stone provides excellent long-term stability without the mechanical failure modes of manufactured edging. Weight works with gravity rather than against it, and natural materials resist frost heave better than rigid systems.
Groundcover Plantings Without Hard Edging
When It's Better: Moderate slopes where erosion control is the primary goal and a softer, more natural transition is aesthetically acceptable. Deep-rooted plants and groundcovers provide the most effective long-term erosion control, protecting soil structure more comprehensively than hard edging alone.
Key Trade-Offs: Eliminates the crisp, clean line that hard edging provides and requires establishment period before full erosion control is achieved.
Living systems reduce installation difficulty, eliminate mechanical failure concerns, and provide ongoing erosion control that improves rather than degrades over time. Particularly effective when combined with narrow vegetative barriers (1-3 feet wide) planted across the slope to slow runoff and trap sediment.
Frequently Asked Questions
Should you put edging around trees?
Yes, edging provides defined mulch beds, erosion prevention, and simplified maintenance by creating a mowing barrier. Keep edging 2-4 inches from the trunk flare to prevent bark rot and girdling roots, and ensure proper drainage to avoid waterlogging the root zone.
What is the best edging material for sloped areas?
Aluminum edging performs best on slopes due to superior corrosion resistance, lightweight handling on difficult terrain, and flexibility that accommodates ground movement. Edging with adjustable stake pockets for angled installation provides enhanced holding power in high-moisture slope environments.
How do you keep edging from shifting on a slope?
Prevent shifting through closer stake spacing (every 2 feet instead of 3-4 feet), extended stakes (12-18 inches) for deeper anchoring, and proper backfill compaction to 90-95% density. Adjustable stake pockets allow optimal positioning, while burying 40-50% of edging height provides resistance to downslope forces.
Can you install tree edging on steep slopes?
Slopes up to 30% can be edged using modified trenching, closer stake spacing, and enhanced drainage management. Steeper slopes often require terracing or retaining walls, while slopes exceeding 45 degrees need engineered solutions beyond standard edging.
How far should edging be from the tree trunk?
Maintain a minimum radius extending to or slightly beyond the tree's drip line—typically 2-4 feet from the trunk for young trees and further for mature specimens. More critically, keep mulch and edging at least 2-4 inches away from the trunk flare itself to prevent moisture accumulation that causes bark rot and encourages girdling roots.
Do you need to adjust edging installation for different slope angles?
Yes, adjustments are essential. Gentle slopes (under 10%) need minimal modification beyond deeper downslope trenching. Moderate slopes (10-20%) require angled staking and closer stake spacing. Steep slopes (over 20%) demand stake spacing every 2 feet, deeper trenching, and extended stakes for adequate anchoring.