Introduction
The difference between an amateur landscape and a professional installation often comes down to one detail: clean, defined borders around trees. A poorly executed tree ring with shifting rocks and encroaching grass screams DIY, while a crisp, permanent border signals expert craftsmanship.
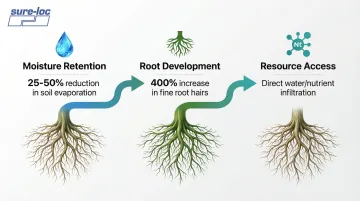
Beyond aesthetics, tree borders serve essential biological functions. Research from Kansas State University shows that mulched tree rings reduce soil moisture evaporation by 25-50% and increase fine root development by up to 400% compared to turfgrass environments.
TLDR:
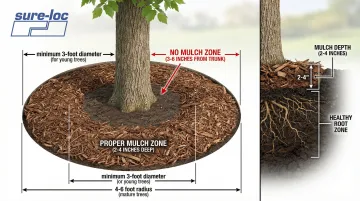
- Size borders to the tree's dripline (minimum 2-3 feet for young trees, 4-6 feet for mature trees)
- Maintain a 3-6 inch bare-soil buffer between mulch and trunk to prevent rot
- Metal edging offers 20+ year lifespan versus plastic's 5-10 years ($10-19/ft installed)
- Install 4-6 inches deep to prevent grass encroachment and material shifting
- Apply 2-4 inches of mulch annually, never exceeding 4 inches to avoid root suffocation
Why Tree Circle Borders Matter
Tree borders function as biological buffer zones that directly impact tree vitality and landscape maintenance efficiency. When you eliminate the competition between turfgrass and tree roots, you create conditions that allow trees to thrive rather than merely survive.
Resource Competition and Tree Health:
Turfgrass is an aggressive competitor that intercepts water and nutrients before they reach tree roots. A defined mulch ring eliminates this competition, allowing resources to infiltrate the tree's root zone directly.
The benefits include:
- Reduces soil evaporation by 25-50%, significantly lowering irrigation demands
- Increases fine root hair development by 400% compared to turfgrass conditions
- Allows water and nutrients to reach the tree's root zone without competition
Mechanical Protection:
Tree borders create a physical barrier that keeps lawnmowers and string trimmers away from the trunk. Mechanical injury to bark acts as a gateway for pathogens and insects, making this protection essential for long-term tree health.
A well-defined edge provides:
- Clear visual boundary for maintenance crews
- Prevention of repeated bark damage from equipment
- Long-term protection against slow tree decline from mechanical injury
Soil Quality Improvements:
Organic mulches decompose over time, improving soil conditions that help trees thrive:
- Enhances soil structure, aeration, and fertility
- Particularly vital in compacted urban soils where roots struggle
- Supports beneficial microorganisms and earthworm populations
- Accelerates nutrient cycling in the root zone
Curb Appeal and Property Value:
Well-defined tree borders create visual focal points that enhance landscape organization and professionalism. The clean lines and intentional design communicate care and attention to detail, directly impacting property perception and value.
Planning Your Tree Border Design
Determining the Right Size and Placement
Proper sizing isn't arbitrary—it's biological. The goal is maximizing the protected root area without interfering with site utility.
Understanding the Dripline and Root Zone:
The dripline is the area directly below the outer edge of the tree's canopy. While often used as a visual guide, feeder roots actually extend well beyond this line—often 2 to 3 times the height of the tree.
For practical purposes, aim to extend borders to the dripline at minimum.
Sizing Standards:
- Young trees: Minimum 3 feet in diameter for every inch of trunk caliper
- Mature trees: 4-6 feet radius from trunk, extending to dripline where feasible
- Trunk clearance: Maintain a strict 3-6 inch bare-soil zone around the trunk—never allow mulch to touch bark
This clearance prevents moisture accumulation against the bark, which leads to phloem death, fungal cankers, and root rot. The "donut" method (mulch ring with bare center) is the single most critical specification for tree health.
Design Principles for Visual Appeal
Proportion and Scale:
Match border size to tree size and overall landscape context. A 2-foot ring around a mature oak looks stingy and unfinished, while a 6-foot border around a young sapling can overwhelm the composition.
Consider the tree's mature size when planning—borders that look generous today may appear cramped in 5-10 years.
Cohesive Design Integration:
Tree borders should complement existing landscape features, hardscaping, and architectural style. Professional-grade metal edging systems work particularly well for projects requiring clean lines and long-term durability:
- Contemporary designs benefit from aluminum or steel edging with geometric shapes
- Traditional landscapes pair well with brick or natural stone borders
- Naturalistic settings work with irregular shapes and weathered materials
- Formal gardens require symmetrical borders with precise alignment
Color and Texture Considerations:
Border materials should enhance rather than compete with plantings:
- Dark materials (black aluminum, weathered steel) recede visually, emphasizing the tree and understory plants
- Light-colored stone or brick creates stronger visual boundaries but can dominate small spaces
- Earth-tone finishes (bronze, brown) blend seamlessly with organic mulch
Assessing Your Site Conditions
Slope and Drainage Evaluation:
Before selecting materials, assess how water moves across your site. On sloped terrain, rigid edging can act as a retaining structure—ensure the design allows water runoff rather than creating a dam that pools water against the root flare.
Trees in poorly drained soils require shallower mulch layers (2-4 inches maximum) to prevent root suffocation.
Underground Utility Verification:
Contact 811 or your local utility notification center a few business days before digging to have underground lines marked. Even shallow trenching for edging carries risk. Marking codes include Yellow for gas/oil, Red for electric, Orange for communication, Blue for potable water, Green for sewer, and Purple for reclaimed water.
Soil Type Considerations:
Sandy soils require deeper edging installation and longer stakes for stability. Clay soils hold edging securely but may require amended drainage. Rocky soils present excavation challenges that may require flexible edging materials that can bridge over obstacles.
Material Options for Tree Borders
Temporary vs. Permanent Border Solutions
You're choosing between loose materials that shift over time and permanent edging systems that maintain crisp lines for decades.
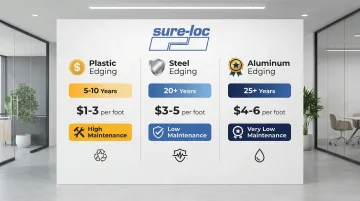
Cost-Benefit Analysis:
Plastic edging offers the lowest entry cost ($5-12/ft installed), but the 5-10 year lifespan means replacement cycles that accumulate costs. Metal edging ($10-19/ft installed) provides 20+ year lifespans, making it more cost-effective over time despite higher initial investment. Factor in labor costs for repositioning loose rock or replacing deteriorated wood when calculating true lifetime costs.
Rock and Stone Borders
Pros:
- Natural aesthetic that complements organic landscapes
- Available in diverse sizes, colors, and textures
- No installation expertise required for loose applications
- Extremely durable material (50+ years)
Cons:
- Displacement from maintenance equipment and foot traffic
- Grass and weeds grow between stones without proper edging
- Difficult to maintain clean lines over time
- Labor-intensive to reset when shifted
Selection and Quantity:
Choose stone sizes appropriate to border width—3-5 inch river rock works for 12-18 inch borders, while 6-8 inch fieldstone suits wider installations.
Calculate quantities by measuring the border's square footage and multiplying by desired depth (typically 3-4 inches for coverage).
Brick and Paver Borders
Brick provides a classic, formal appearance that works well with traditional architecture.
Effective Applications:
- Straight runs and gentle curves
- Formal garden settings
- Complementing brick hardscaping or architecture
- Level terrain with stable soil
Installation Techniques:
Soldier course (bricks standing upright) creates taller borders but requires solid base preparation to prevent tipping. Stacked horizontal courses offer more stability but require more materials.
Both methods benefit from landscape adhesive between courses for permanent installations.
Limitations:
Brick struggles with tight curves—the rigid rectangular form creates gaps that compromise the border's integrity. On slopes, brick requires terracing or mortar installation to prevent shifting.
Metal and Plastic Edging Systems
Moving beyond traditional materials, permanent metal and heavy-duty plastic edging systems eliminate the recurring maintenance that temporary solutions require.
Material Comparison:
| Material | Installed Cost | Lifespan | Maintenance | Key Characteristics |
|---|---|---|---|---|
| Plastic | $5-12/ft | 5-10 years | High: cracking, heaving | Economical; quality varies significantly |
| Steel | $10-18/ft | 20+ years | Low: occasional rust protection | Durable; holds shape; clean lines |
| Aluminum | $11-19/ft | 25+ years | Very low: rust-proof | Lightweight; flexible; coastal-suitable |
Sure-loc Aluminum Edging:
Aluminum systems offer specific advantages for tree borders. Sure-loc edging features a dual stake locking system with no overlapping joints, creating seamless connections that remain invisible once installed. The material's resilient flexibility allows for smooth curves around tree bases while maintaining rigid straight lines where needed.
Key benefits for tree applications include:
- Lifetime durability without rust, rot, or brittleness
- Made from 100% recycled aluminum in the USA
- Flexible enough for tight curves (18-24 inch radius depending on thickness)
- Anti-frost heave technology prevents displacement from ground movement
- Available in multiple finishes (mill, black, bronze, brown) to complement landscape aesthetics
The system includes end stake adapters that slide over the edging, allowing for staking at any point—particularly valuable when working around tree roots or obstacles.

Wood and Natural Material Borders
Realistic Expectations:
Timber, log rounds, and bamboo provide rustic aesthetics but come with maintenance realities. Expect 3-7 year lifespans before rot, splitting, and insect damage require replacement.
Wood in ground contact deteriorates faster in humid climates and poorly drained soils.
Best Applications:
Wood borders work for temporary installations, naturalistic settings where weathered appearance is desirable, or budget-constrained projects where replacement is planned. Avoid wood in high-visibility professional landscapes where deterioration impacts perceived quality.
Step-by-Step Installation Guide
Site Preparation
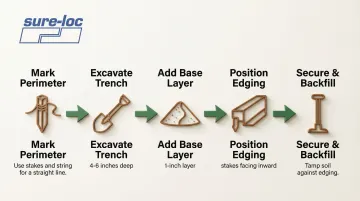
Marking the Perimeter:
Use stakes and string or spray paint to mark the border perimeter. When creating circular tree rings, drive a stake at the desired radius from the trunk and use it as a compass pivot point.
Maintain consistent distance from the trunk—never closer than 12 inches, ideally extending to the dripline.
Excavation Techniques:
Dig trenches 2-3 inches deep for most edging materials. This provides sufficient anchorage while minimizing disturbance to shallow feeder roots.
Deeper installations (4-6 inches) require careful excavation to avoid severing roots larger than 2 inches in diameter. Roots of this size provide essential stability and may require arborist consultation if cutting is necessary.
Soil Preparation:
Prepare the installation area:
- Remove grass, weeds, and roots within the border
- Tamp the trench bottom to create a stable base
- Consider landscape fabric with loose materials like rock to suppress weeds (note: this can impede water infiltration and organic matter incorporation)
Installing on Level Ground
Base Layer Installation:
Rigid edging requires a 1-inch layer of leveling sand in the trench bottom. Tamp the sand for stability before placing edging. This layer handles minor grade variations and provides drainage.
Edging Placement:
Position edging sections with stake pockets facing inward (toward the tree). Use a level and straightedge to maintain consistent height and alignment.
Connect sections according to manufacturer specifications. Metal systems like Sure-loc's aluminum edging use dual stake connections for seamless joints, while plastic may have snap-together designs.
Securing Materials:
Drive stakes below grade to prevent tripping hazards and mower damage. Backfill the trench on both sides of the edging, tamping soil firmly to eliminate voids.
Stacked materials like brick require landscape adhesive between courses for permanent stability.
Installing on Sloped or Uneven Ground
Trench Depth Adjustment:
On slopes, choose between two approaches:
- Level borders: Adjust trench depth to compensate for grade; creates a formal appearance but requires significant excavation on the uphill side
- Following the grade: Looks more natural and simplifies installation but may create drainage challenges
Terracing Techniques:
Steep slopes (greater than 15% grade) benefit from multi-level borders or terracing to prevent erosion and material displacement. Each terrace level should have its own edging perimeter with proper drainage between levels.
Stability Considerations:
Use longer stakes (12-18 inches) on slopes for additional anchoring. Metal edging performs better than plastic on slopes due to superior rigidity.
Ensure the design allows water to flow through or around the border rather than pooling behind it.
Finishing Touches
Backfilling and Grading:
Grade soil within the border so the finished mulch surface will be approximately 1 inch below adjacent pavement or curbs. This prevents mulch washout during rain and creates a clean visual edge.
Mulch Installation:
Apply organic mulch to a depth of 2-4 inches. Never exceed 4 inches, as excessive depth restricts soil oxygen and suffocates roots. Create the "donut" shape by leaving 3-6 inches of bare soil around the trunk.
Mulch Selection:
Choose mulch based on your priorities:
- Shredded hardwood bark and wood chips work well for most applications
- Pine bark nuggets provide longer-lasting coverage but don't improve soil as quickly
- Avoid dyed mulches near sensitive trees (some dyes contain chemicals that may affect soil chemistry)
Special Considerations
Tree Health and Root Protection
Critical Root Zone (CRZ)
The CRZ radius is calculated as 1 foot for every 1 inch of trunk diameter at breast height. No excavation, trenching, or grade changes should occur within this zone without arborist authorization.
Roots in this area provide essential stability and nutrient uptake—damage here can prove fatal.
Root Pruning Considerations
If installation requires severing roots larger than 2 inches in diameter, consult a certified arborist to assess stability risks. Some municipalities require permits for root work within protected zones.
Grade Change Sensitivity
Trees particularly sensitive to grade changes:
- Oaks
- Maples
- Beeches
- Dogwoods
Any significant grade change (cutting or filling) within the drip line requires site-specific mitigation to prevent root suffocation or damage.
Dealing with Common Challenges
Understanding these root protection principles helps you navigate common installation challenges in the field.
Surface Root Management
Never cut large surface roots to fit edging. Instead, use flexible edging materials that bridge over roots or contour the border to encompass them.
Poor Drainage Solutions
In heavy clay or poorly drained soils, reduce mulch depth to less than 2 inches. Excessive mulch on wet soils retains too much moisture, leading to root rot.
Ensure organic layers aren't matted—break up compacted mulch annually to allow water infiltration and gas exchange.
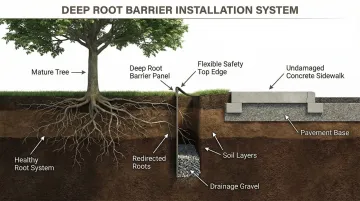
Hardscape Integration
When installing edging near paved surfaces, root barriers can be effective. Research indicates they reduce root biomass in the top foot of soil, diverting roots deeper. This protects adjacent hardscapes from uplift.
Install barriers with the top edge above grade to prevent roots from growing over them.
Seasonal Installation Timing
Timing your installation properly protects tree health and ensures long-term edging performance.
Optimal Windows
Spring (mid-spring after soil temperatures reach 50°F) and fall offer ideal installation conditions. Spring installation allows roots to benefit from improved conditions during the growing season.
Fall installation insulates roots against winter cold and retains moisture during irregular rain periods.
Conditions to Avoid
Don't attempt installation when ground is frozen—this prevents proper trenching and can damage soil structure.
Avoid working on saturated soils, as traffic and excavation on wet ground cause severe compaction that destroys soil porosity and restricts root growth.
Maintenance and Long-Term Care
Routine Maintenance Tasks
Key maintenance tasks include:
- Mulch replenishment: Refresh mulch every 6-18 months as it decomposes. Check depth annually—if it drops below 2 inches, top it up. Break up matted layers with a rake before adding new mulch.
- Edging maintenance: Reposition loose materials (rocks, stones) annually. Metal and rigid plastic edging require minimal maintenance—inspect annually for heaving or separation and reset as needed. Re-cut edges with a spade annually for borders without rigid edging.
- Weed control: A 2-4 inch mulch layer suppresses most weeds by blocking light. Remove weeds by hand when small. Avoid herbicides within the root zone of newly established trees.
Preventing Common Problems
Grass Encroachment:
Proper edging depth (4-6 inches below grade) creates an effective grass barrier.
For additional protection, install edging so 1-2 inches remains above grade, creating a physical barrier grass cannot easily cross.
Addressing Settling and Erosion:
Check borders after heavy rains for erosion or settling. Add soil to low spots and regrade as needed.
For persistent erosion issues, improve drainage or consider terracing on steep slopes.
When to Upgrade to Permanent Solutions
When maintenance problems persist, it may be time for a permanent solution. Signs temporary borders have failed:
- Constant repositioning of loose materials
- Grass consistently growing into the border despite edging efforts
- Deteriorated wood edging with rot, splitting, or insect damage
- Cracked or brittle plastic edging
- Excessive time spent on border maintenance
Long-Term Value:
Professional-grade aluminum edging—like Sure-loc's systems used in projects ranging from commercial landscapes to national memorials—eliminates ongoing maintenance costs and labor. While initial investment is higher, the 20-25 year lifespan and minimal maintenance requirements make permanent systems more cost-effective than replacing temporary solutions every 5-7 years.
Frequently Asked Questions
How wide should a tree ring border be?
Tree ring borders should extend 2-3 feet from the trunk for young trees and 4-6 feet for mature specimens, ideally reaching the dripline. This sizing protects the active root zone where nutrient and water absorption occur.
What is the best material for tree circle borders?
Aluminum and steel edging ($10-19/ft) offer 20-25 year lifespans with minimal maintenance, while plastic ($5-12/ft) provides economical entry but requires replacement in 5-10 years. Loose rock and brick suit specific design styles but demand ongoing maintenance.
How do you keep grass from growing into tree rings?
Install edging 4-6 inches below grade with 1-2 inches above ground to create a physical barrier. Maintain a 2-4 inch mulch layer and re-edge borders annually if using non-rigid materials.
Should tree ring borders be level or follow the ground slope?
Either approach works depending on aesthetic preference and drainage needs. Level borders create formal appearance but require more excavation on slopes. Following the natural grade simplifies installation and looks more organic. On slopes exceeding 10%, following grade prevents erosion and material displacement.
How deep should landscape edging be installed around trees?
Install landscape edging 4-6 inches below grade for optimal performance. This depth prevents shifting from frost heave and creates an effective barrier against grass encroachment. Deeper installations (6-8 inches) benefit sandy soils or high-traffic areas but require careful work to avoid root damage.
Can tree roots damage landscape borders over time?
Surface roots can displace temporary borders like loose rock or wood as they expand. Properly installed permanent edging accommodates root growth—flexible materials like aluminum bend slightly while maintaining position. Expect displacement issues primarily with fast-growing species like willows, maples, and poplars that develop aggressive surface roots.