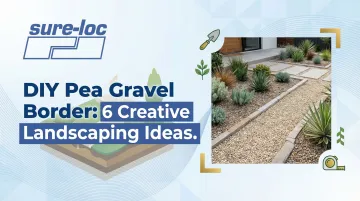
Transform Your Landscape with DIY Pea Gravel Borders
Pea gravel borders transform outdoor spaces with minimal effort. These small, rounded stones—typically ¼ to ½ inch in diameter—define garden beds, pathways, and property lines while adding texture and dimension that elevates curb appeal.
The appeal extends beyond aesthetics. Unlike mulch that requires annual replacement or grass that demands weekly mowing, pea gravel provides a permanent, low-maintenance solution that actually improves drainage.
Research shows that properly installed gravel borders can achieve infiltration rates of 8.0 to 2,000 cm/h, helping manage stormwater runoff while reducing water pooling around foundations.
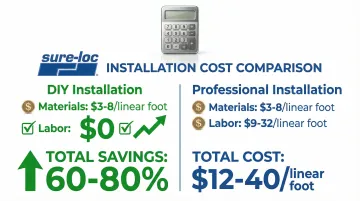
The cost advantages are equally compelling. Professional stone border installation typically runs $12-40 per linear foot, while DIY projects using quality edging materials cost just $3-8 per linear foot—a savings of 60-80% on labor alone.
TLDR: Key Takeaways
- Pea gravel borders cost $3-8/linear foot for DIY installation versus $12-40 for professional work
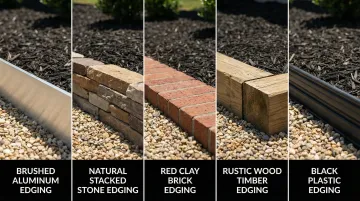
- Six design styles accommodate modern, rustic, and traditional landscape aesthetics
- Proper installation requires landscape fabric, quality edging, and 2-3 inches of compacted gravel
- Aluminum and steel edging last 15-50+ years versus 1-10 years for plastic
6 Creative Pea Gravel Border Ideas for Your Landscape
Modern Metal Edge Border
Sleek aluminum or steel edging delivers the crisp, architectural lines that contemporary landscapes demand. Metal edging creates razor-sharp definition between gravel and lawn, maintaining clean boundaries without the visual bulk of stone or wood.
Key benefits:
- Corrosion-resistant aluminum lasts 15-25+ years with zero maintenance
- Steel options offer 25-50+ year lifespan with proper coating
- Thin profile (⅛" to 3/16" thickness) creates nearly invisible borders
- Flexible enough for curves yet rigid enough for perfectly straight runs
Design tip: Pair black anodized metal edging with light gray or white pea gravel and architectural plants like Karl Foerster feather reed grass or blue fescue. The high contrast emphasizes geometric patterns and creates a gallery-like outdoor aesthetic.
Professional-grade systems like Sure-loc aluminum edging use a proprietary dual stake locking system that creates seamless connections without overlapping joints. The end stake adaptors allow staking at any point along the edge, giving you precise control over curves and straight runs while maintaining invisible, clean lines.
Natural Stone Edge Border
Flagstone, fieldstone, or river rock edging brings organic, cottage-garden charm to pea gravel borders.
The irregular shapes and varied colors of natural stone create visual interest while establishing a rustic, established feel.
Installation considerations:
- Bury stones at least one-third of their depth for stability
- Select flat stones 2-4 inches thick for consistent height
- Mix stone sizes (6-12 inches) for authentic, natural appearance
- Allow moss and lichen to develop for aged patina
Natural stone delivers exceptional longevity—25-100+ years according to landscape material studies—making it a permanent investment despite higher initial costs.
Classic Brick Paver Border
Traditional brick edging adapts to both formal and informal garden styles through varied laying patterns. The soldier course (bricks standing vertically) creates formal definition, while basket weave or running bond patterns add visual texture.
Versatility advantages:
- Red clay brick adds warmth to cottage and traditional landscapes
- Gray concrete pavers suit contemporary designs
- Header course (bricks laid horizontally) provides wider borders
- Mortared installations prevent shifting; dry-laid allows flexibility
Brick borders last 20-50+ years. If landscape plans change, you can salvage and reinstall them, offering flexibility that permanent concrete cannot match.
Reclaimed Wood Timber Border
Pressure-treated lumber, railroad ties, or landscape timbers provide rustic appeal at budget-friendly prices.
Wood borders work particularly well in woodland gardens, vegetable plots, and casual landscape designs.
Cost and maintenance reality:
- Pressure-treated 4x4 timbers cost $8-15 per 8-foot section
- Expect 7-15 year lifespan depending on climate and wood quality
- Requires periodic treatment with wood preservative
- Prone to warping, splitting, and rot in consistently moist conditions
Wood excels for temporary installations or budget-conscious projects where the 5-10 year replacement cycle fits maintenance plans.
Living Plant Edge Border
Low-growing perennials, herbs, or groundcovers create soft, living boundaries that change with seasons. This approach blurs hard edges while adding fragrance, texture, and pollinator habitat.
Recommended plants:
- Creeping thyme – Drought-tolerant, fragrant, purple blooms, 2-3" height
- Sedum – Succulent foliage, various colors, 3-6" height
- Mondo grass – Evergreen, shade-tolerant, 4-6" height
- Lavender – Fragrant, silvery foliage, 12-18" height
Maintenance requirements:
- Allow 18-24 months for full coverage establishment
- Trim regularly to prevent encroachment into gravel
- Best for low-traffic borders with manageable upkeep
Plant borders work best where occasional maintenance is acceptable and the softened aesthetic suits your design vision.
Concrete Curbing Border
Poured or molded concrete edging provides permanent, customizable solutions with professional curb appeal. Concrete handles curves, accepts integral color, and can be stamped with decorative patterns.
Design flexibility:
- Create continuous curves without joints or seams
- Add earth-tone pigments (terra cotta, sandstone, charcoal)
- Stamp patterns mimicking stone or brick
- Install at custom heights (3-6 inches) for specific needs
Concrete curbing lasts 20-30+ years and provides the most robust gravel containment, though installation complexity and cost ($8-12 per linear foot for DIY) exceed other options.
Choosing the Right Edging Material for Your Pea Gravel Border
Material selection determines both initial investment and long-term maintenance requirements. Understanding the tradeoffs between cost, durability, and installation complexity ensures the right choice for your project.
Durability and Lifespan Comparison
| Material | Expected Lifespan | Maintenance Requirements |
|---|---|---|
| Natural Stone | 25-100+ years | Minimal; occasional resetting |
| Corten Steel | 25-50+ years | None; develops protective patina |
| Aluminum | 15-25+ years | None; won't rust or degrade |
| Concrete | 20-30+ years | Minimal; may crack in freeze-thaw |
| High-Grade Plastic | 10-20 years | Low; inspect annually for UV damage |
| Standard Plastic | 1-10 years | Moderate; replace damaged sections |
| Pressure-Treated Wood | 7-15 years | High; treat every 2-3 years |
Research on landscape material longevity confirms that initial material cost trades off against replacement frequency—investing in durable materials reduces lifetime costs.
Cost Considerations
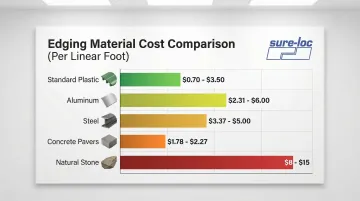
Material costs per linear foot (2024-2026 pricing):
- Standard plastic: $0.70-$3.50
- Aluminum: $2.31-$6.00
- Steel: $3.37-$5.00
- Concrete pavers: $1.78-$2.27
- Natural stone: $8-15 (material only)
Factor installation labor into total cost calculations. Plastic snap-together systems install in minutes per section, while stone borders require excavation, leveling, and careful placement—potentially tripling installation time.
Installation Difficulty Levels
Easiest: Plastic snap-together edging with integrated stakes requires only a rubber mallet and basic trenching.
Moderate: Aluminum edging systems demand precise trenching (4-6 inches deep), stake placement, and backfilling but require no special tools beyond a spade and hammer.
Most Complex: Poured concrete curbing requires forms, mixing equipment, proper slope for drainage, and finishing skills—often best left to professionals.
Climate and Soil Compatibility
Freeze-thaw climates: Metal edging with deep staking (4-6 inches) resists frost heave better than shallow plastic. Frost heave occurs when soil moisture freezes and expands, lifting inadequately anchored materials.
Professional-grade systems like Sure-loc address this with Anti Frost Heave Technology—stake pockets accept stakes at 45-degree angles that counteract upward frost forces.
Wet, poorly drained soils: Avoid wood, which rots rapidly in consistently moist conditions. Aluminum and plastic provide excellent moisture resistance.
Sandy or loose soils: Deeper edging (5.5-8 inches) with extended stakes (12-18 inches) prevents shifting and provides adequate anchoring.
Materials and Tools Needed for DIY Installation
Essential Materials
| Material | Specification | Purpose |
|---|---|---|
| Pea gravel | Calculate: Length (ft) × Width (ft) × Depth (in) ÷ 324 = cubic yards needed | Primary decorative surface layer |
| Landscape fabric | Non-woven geotextile, 3-4 oz minimum weight | Weed suppression and drainage |
| Edging material | Metal, plastic, or stone (purchase 10% extra) | Border containment and definition |
| Base layer gravel | ¾-inch crushed stone, 1-2 inch depth | Drainage and stability foundation |
For a 10' × 10' area at 3" depth, you'll need approximately 0.93 cubic yards of pea gravel. One ton of gravel covers roughly 100 square feet at 2-inch depth.
Professional landscape contractors often choose aluminum or steel edging systems for permanent installations. These materials withstand maintenance equipment and provide crisp, lasting borders without the flexibility issues common in plastic options.
Required Tools
- Marking spray paint or garden hose
- Straight-edge spade or edging tool
- Garden rake
- Hand tamper or plate compactor
- Wheelbarrow
- 4-foot level
- 25-foot measuring tape
- Rubber mallet (for plastic edging)
- Hammer (for metal edging stakes)
Optional but Helpful Items
- Garden cultivator for breaking compacted soil
- Landscape fabric stakes (every 2-3 feet)
- Heavy-duty work gloves
- Safety glasses
- Knee pads for comfort during installation
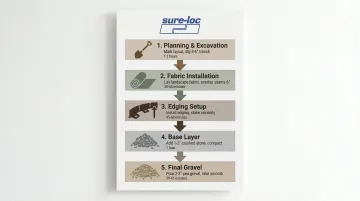
Step-by-Step Installation Guide
Planning and Preparation
Mark your border layout with marking paint for straight sections and a garden hose for curves. Walk the perimeter to visualize the finished result before excavating.
Measure linear footage along your marked line. Add 5-10% for waste and adjustments. Calculate gravel volume based on total square footage and desired 2-3 inch depth.
Excavation and Base Preparation
Dig a trench 4-6 inches deep and 8-12 inches wide along your marked line. Remove all grass, roots, and organic debris. Decomposing material creates settling and uneven surfaces.
Key excavation requirements:
- Create a slight slope (minimum 1-2%) away from structures for drainage
- Building codes require a minimum 6-inch fall within 10 feet of foundations to prevent water damage
- Compact soil base thoroughly with a hand tamper, working in 2-inch layers if excavating deeply
- Proper compaction prevents future settling that creates low spots and gravel migration
Installing Landscape Fabric
Installation steps:
- Lay commercial-grade landscape fabric across the entire excavated area
- Overlap seams by 6 inches to prevent weed breakthrough
- Secure with landscape staples every 2-3 feet
- Pull fabric taut to eliminate wrinkles
Landscape fabric effectiveness diminishes when exposed to sunlight and organic matter accumulation. The 2-3 inch gravel layer protects fabric from UV degradation and extends its functional life to 10-15 years.
Setting the Edging
Install your chosen edging according to manufacturer specifications:
| Edging Type | Installation Method | Staking Pattern |
|---|---|---|
| Plastic | Place with top edge ½ inch above grade | Stakes every 18-24 inches and at all curves |
| Aluminum/Steel | Position with top edge ½ inch above grade | Stakes at 45° angles every 4 feet (every 2 feet on curves) |
| Stone/Brick | Set on 1-inch sand bed | Bury at least one-third of material depth |
Systems like Sure-loc use dual stake locking mechanisms that create seamless connections without overlapping joints at seams. This eliminates visible gaps and provides superior holding strength on curves.
Check level frequently with a 4-foot level, adjusting as needed. Backfill behind edging and tamp firmly to lock in position.
Adding the Gravel Layers
Layer installation sequence:
- Pour a 1-2 inch base layer of ¾-inch crushed stone
- Rake level and compact thoroughly with a hand tamper
- Add 2-3 inches of pea gravel on top of the base layer
- Rake smooth, maintaining consistent depth throughout
- Lightly compact by walking the surface or using a hand tamper
The crushed stone base prevents water pooling and provides a stable foundation. Avoid over-compacting the pea gravel layer, as this makes the surface uncomfortable to walk on.
Final Touches
Walk the border perimeter, checking for:
- Low spots requiring additional gravel
- Edging misalignment or insufficient height
- Exposed landscape fabric
- Loose or inadequately secured edging sections
Top-dress with additional gravel after the first rain, which reveals settling patterns. Expect to add ¼-½ inch of material to restore optimal depth.
Maintenance Tips for Long-Lasting Pea Gravel Borders
Regular Upkeep
Monthly raking: Redistribute stones to maintain even coverage and smooth out ruts from foot traffic or maintenance equipment. Use a garden rake with firm tines, working in multiple directions to level high and low spots.
Debris removal: Clear leaves and organic matter weekly with a leaf blower. Organic accumulation creates a compost layer where weeds germinate, eliminating landscape fabric benefits.
This buildup also traps moisture and accelerates material breakdown.
Weed control: Pull weeds immediately upon appearance. Landscape fabric prevents soil-based germination but cannot stop seeds that land on the gravel surface. Early removal prevents root establishment and seed production.
Seasonal Refreshing
Add ½ inch of new gravel every 2-3 years to replace stones displaced by foot traffic, lawn equipment, and weather. Gravel migration is inevitable. Regular replenishment maintains appearance and functionality.
Inspect edging after winter for frost heave damage or shifting. Reset displaced sections immediately to prevent gravel escape and progressive deterioration.
Addressing Common Issues
Common problems and their solutions:
- Gravel migration into lawn: Indicates inadequate edging depth or loose anchoring. Reinstall edging 1-2 inches deeper with additional stakes. Professional-grade aluminum or steel edging systems provide superior anchoring with adjustable stake placement to prevent migration.
- Persistent weed growth: Pull back gravel, inspect fabric for tears or degradation, and patch damaged areas with fabric repair tape or replacement sections.
- Uneven settling: Remove gravel, compact the base layer thoroughly, and reinstall with a proper drainage layer to prevent future issues.

Common Mistakes to Avoid When Installing Pea Gravel Borders
Skipping Landscape Fabric
Without landscape fabric, gravel sinks into soil within 1-2 years, creating a muddy, weed-infested mess. The fabric provides essential separation between gravel and soil while allowing water drainage.
Use commercial-grade non-woven fabric—cheap alternatives tear during installation and degrade rapidly. This modest cost difference ($0.04-0.08 per square foot) provides significantly better long-term performance.
Using Inadequate Edging
Fabric alone won't keep gravel contained—you need proper edging to complete the border.
Flimsy plastic edging lifts during frost heave, bends under pressure, and degrades under UV exposure within 1-3 years. Standard plastic is the most common edging failure mode, requiring frequent replacement and creating ongoing maintenance headaches.
Professional-grade alternatives include:
- Aluminum edging systems (15-25 year lifespan, ideal for residential borders)
- Steel edging (commercial-grade durability for high-traffic areas)
- Concrete or stone (permanent solutions for formal landscapes)
Professional landscape contractors often choose aluminum systems like those from Sure-loc Edging for their flexibility, durability, and clean appearance. These systems resist frost heave and UV degradation while maintaining crisp borders for decades.
Incorrect Gravel Depth
Depth matters more than most DIYers realize:
Too shallow (under 2 inches): Exposes landscape fabric to UV damage, creates sparse appearance, and allows weeds to establish easily.
Too deep (over 4 inches): Makes walking uncomfortable, increases material costs unnecessarily, and complicates raking and maintenance.
The optimal 2-3 inch depth balances aesthetics, functionality, and cost. This range protects the fabric while creating a comfortable walking surface.
Frequently Asked Questions
What is the best edging material for pea gravel borders?
Aluminum and steel edging provide the best long-term value. Aluminum offers 15-25+ year lifespan with zero maintenance, while steel delivers 25-50+ years with proper coating. Standard plastic ($1-3.50 per linear foot) costs less initially but requires replacement every 1-10 years.
How deep should a pea gravel border be?
Install 2-3 inches of pea gravel after compaction for adequate weed suppression and comfortable walking surface. Add a 1-2 inch crushed stone base layer beneath for drainage and stability.
Do you need landscape fabric under pea gravel borders?
Yes—commercial-grade landscape fabric is essential to prevent gravel from sinking, suppress weeds, and extend border life. Without fabric, maintenance becomes a constant battle as gravel migrates and weeds proliferate.
How do you keep pea gravel from spreading beyond the border?
Quality edging installed at proper depth (4-6 inches) with secure anchoring prevents gravel migration. Professional-grade aluminum systems like Sure-loc's edging with 45-degree stake angles resist frost heave and ground movement that causes standard edging to fail.
Can you install pea gravel borders on a slope?
Yes, but slopes exceeding 15 degrees require deeper edging burial (6-8 inches), closer stake spacing (12-18 inches), and potentially terracing. Larger stone sizes (½-¾ inch) resist downhill migration better than standard pea gravel.
How much does a DIY pea gravel border cost?
Expect $3-8 per linear foot depending on edging choice. A typical 100-linear-foot border costs $300-800 including gravel ($75-100), landscape fabric ($25-50), edging ($100-600), and base material ($50-75). Professional installation adds $12-40 per linear foot in labor costs.